
You’ve poured your heart and soul onto that canvas, and now it’s finished. The next crucial step is making sure that vibrant artwork lasts a lifetime—and maybe even longer. The secret to preserving your acrylic paintings isn't complicated; it really comes down to a two-part game plan: proactive environmental control and thoughtful physical care.
This means being smart about where you hang your art to shield it from things like harsh light and humidity, while also knowing the right way to handle, clean, and protect it.
Why Bother Preserving Your Acrylic Paintings?
Keeping an acrylic painting in great shape is about more than just finding an empty spot on the wall. It’s an active process of protecting your creation from the very elements that can slowly dull its colors and weaken its structure.
Oils have centuries of conservation history behind them, but modern acrylics play by a different set of rules. Getting to know their unique needs is the single best way to protect your investment of time, emotion, and creativity. Think of it as an ongoing conversation with your artwork, one that starts the moment the paint dries.
What Makes Acrylics So Different?
At its core, acrylic paint is just pigment suspended in an acrylic polymer emulsion. When the water in the paint evaporates, what's left is a flexible, durable, and water-resistant film. This is what gives acrylics their brilliant color and quick-drying nature, but it also creates a few specific vulnerabilities you need to know about.
Here’s a quick rundown of what to keep in mind:
- They're Thermoplastic: This is a big one. Acrylic paint actually softens when it gets warm and becomes more brittle when it's cold. Wild temperature swings can lead to cracking, or worse, make the surface just sticky enough to become a magnet for dust and dirt.
- The Surface is Porous: Even when dry, the paint film has microscopic pores. While this helps it grab onto the canvas, it also means that grime, dust, and other pollutants can get embedded over time, which can make cleaning a pretty delicate operation.
- Lightfastness Isn't a Guarantee: Modern, professional-grade acrylics have fantastic lightfastness ratings. However, no pigment is completely immune to the fading power of long-term exposure to ultraviolet (UV) light.
A common myth I hear is that acrylics are basically indestructible. While they are incredibly durable, their real longevity comes down to how well you care for them. The simple habits you start today will directly determine how vibrant your art looks decades from now.
Understanding these core traits is the first real step in learning how to preserve your paintings effectively. This guide is your roadmap. We'll walk through everything from setting up the perfect environment to finally settling the great varnish debate. You’ll see why controlling light and humidity is your best line of defense and how a few easy habits can prevent the most common problems down the road.
Let's make sure your creativity is protected for generations to come.
Creating the Perfect Environment for Your Artwork

Before we get into the hands-on stuff like cleaning or varnishing, let's talk about the single most powerful tool you have for preserving your acrylic paintings: the room they live in. Think of the environment as your art's first and most important line of defense against aging. You could have used the best paints in the world, but a bad environment can undo all of that.
So many of the common problems I see with acrylics—cracking, colors fading, or the surface getting weirdly sticky—can be traced right back to the room's conditions. By getting a handle on a few key factors, you can dramatically slow down the clock and keep your art looking fantastic for decades.
Finding the Goldilocks Zone for Temperature
Here’s a fun fact about acrylic paint: it's thermoplastic. In simple terms, this means it gets a bit soft when it's warm and becomes harder and more brittle when it's cold. When the temperature in a room swings back and forth, it puts a ton of physical stress on the paint, causing it to expand and contract over and over.
Just picture a painting hung on the wall directly over a radiator that clicks on and off all winter. That constant cycle of heating and cooling is a recipe for a network of fine cracks to develop over the years. On the flip side, a piece stored in a sweltering attic during the summer can get soft and tacky, turning its surface into a magnet for any dust floating by, which can then get permanently stuck.
The sweet spot you're aiming for is a steady temperature between 65-75°F (18-24°C). But honestly, consistency is the real hero here. A room that stays within a stable range is far better for your art than one that experiences wild temperature swings, even if the "average" temperature seems okay.
The Critical Role of Humidity Control
Right alongside temperature, humidity is the other big environmental factor you've got to watch. The support your painting is on, whether it's canvas or a wood panel, is really sensitive to the amount of moisture in the air.
When humidity gets too high (creeping above 60%), a canvas can actually absorb that moisture from the air and go slack, which leads to that dreaded sagging. High humidity also rolls out the welcome mat for mold and mildew, which can leave behind ugly stains that are often impossible to remove.
But if the air is too dry (dropping below 40%), both the canvas and the acrylic paint itself can become brittle, making them much more likely to crack.
You're looking for that perfect balance, which is a relative humidity (RH) of around 40-50%. This range is dry enough to keep mold away but has enough moisture to prevent the materials from drying out and becoming fragile. If you're struggling to hit that target, there are some great tips for controlling humidity in your house that can make a big difference.
Temperature and humidity are a team—you can't really separate them. Research from conservation experts confirms that the aging process in acrylics is heavily tied to both. For example, the paint film gets significantly stiffer and more brittle at lower temperatures, especially when combined with a moderate humidity of 40–50% RH. This is why an unheated room in the winter is a particularly risky place for a painting.
Battling the Invisible Threat of UV Light
Of all the things that can harm your painting, ultraviolet (UV) light is probably the most relentless and sneaky. It’s the number one reason colors fade and lose their punch over time. Both sunlight and even some types of artificial lights give off UV rays that chemically break down the pigments in the paint.
The most important rule I can give you is this: never, ever hang an acrylic painting in direct sunlight. I can't stress this enough. Even just a couple of hours of direct sun each day can cause noticeable fading in a matter of years. An interior wall that never gets hit by direct sun is always your best bet.
But what about the lights inside your house? You can minimize that risk, too.
- Go with LEDs: Modern LED bulbs are fantastic because they emit next to no UV radiation and don't produce much heat. They are by far the safest choice for lighting your artwork.
- Ditch the Fluorescents: If you have any old-school fluorescent tube lights, know that they are notorious for high UV output. It's best to keep your art far away from them.
- Give It Some Space: Always make sure there's a good amount of distance between the light source and the painting. This prevents any heat from building up on the surface, which, as we know, isn't great for acrylics.
Simply being thoughtful about where you hang your art and what lights you use is one of the most effective preservation acts you can perform. It's a simple step that prevents irreversible damage down the road.
Keeping Your Paintings Clean and Dust-Free
Over time, even in the cleanest homes, a fine layer of dust and grime can settle on your painting. It's inevitable. This film can dull the vibrant colors you fell in love with and obscure the finer details. When it comes to cleaning acrylics, I always tell people the golden rule: less is more. The whole point is preservation, not aggressive scrubbing, so a delicate touch is everything.
You have to remember that acrylics are thermoplastic. This just means the surface can be slightly soft and even a bit tacky, especially when the room is warm. That stickiness makes it a perfect trap for dust, which can embed itself right into the paint film. This is why we have to be so careful to avoid causing permanent damage.
The Safest First Step: A Gentle Dusting
Before you even think about reaching for a liquid cleaner, your first and safest move for routine upkeep is a simple, gentle dusting. Honestly, for regular maintenance, this is probably all you'll ever need to do.
Grab a soft, natural-hair brush—something like a hake or a large goat-hair brush. You want it to be incredibly soft so there's no chance of scratching the surface. Just gently sweep the brush across the painting, working from the top down with almost no pressure. This will lift any loose dust without scuffing the delicate paint or any varnish you might have on there.
A Quick Word of Warning: Steer clear of commercial feather dusters or synthetic cloths. Feather dusters can have sharp quills, and synthetic fibers can easily snag on any texture in your painting. You could end up scratching the surface or, ironically, leaving behind more lint than you started with.
When Dust Becomes Grime
So, what happens if you've picked up an older painting, or maybe one that's been hanging in a kitchen or a smoker's home? In those cases, a dry brush just isn't going to cut it. This is where we can move on to a slightly more involved method, but you have to proceed with extreme caution.
First things first, never, ever use household cleaners, all-purpose sprays, or any kind of chemical solvent on your art. These products are loaded with ammonia, alcohol, or other harsh agents that can literally dissolve the acrylic paint, strip away varnish, and cause ugly, irreversible discoloration.
For that more stubborn grime, here's the technique professional conservators use:
- Test a small spot first. I can't stress this enough. Always start in a small, inconspicuous corner of the painting. This is your safety check to make sure your cleaning method won't cause a bad reaction before you tackle the whole piece.
- Only use distilled water. Tap water is full of minerals that can leave a cloudy film on your painting when it dries. Stick to distilled water.
- Use a quality cotton swab. Lightly dampen a high-quality cotton swab (the kind from an art supply store, not a Q-tip that will shed fibers) with the distilled water. Squeeze out all the excess; you want it damp, not dripping.
- Roll, don't rub. Gently roll the damp swab over your little test area. Rubbing can push grime deeper into the paint's pores or scuff the surface. A light rolling action is what you're after.
- Check for color lift. Take a close look at the cotton swab after a few rolls. Do you see any of the painting's color on it? If you do, stop immediately. This is a huge red flag that the surface is unvarnished or the paint is unstable. Any further cleaning should be handed over to a professional conservator.
If your test spot comes out clean with no paint lift, you can carefully proceed across the rest of the painting. Just remember to work in small sections and use a fresh swab for each new area to avoid spreading grime around.
This process is very specific to acrylics. If you’re curious about how it differs from other media, our guide on how to clean oil paintings gives a great side-by-side comparison.
A Peek Behind the Curtain: The Science of Cleaning Acrylics
There's a reason conservators are so cautious with acrylics. The paint film is just incredibly sensitive. Studies have shown that some common solvents, like ethyl alcohol, can wreak havoc, either by unnaturally smoothing the surface or creating ugly traction lines.
Interestingly, that thermoplastic quality means temperature plays a big role. Cleaning with cold water can actually be safer because the paint film is harder and less likely to soften or become tacky. It's a fascinating and complex field, and you can discover more insights about the conservation of acrylic paintings if you want to geek out on the science.
Ultimately, the best tool you have is proactive care. A regular, gentle dusting will prevent the kind of buildup that requires this more intensive cleaning. And if you ever feel out of your depth, calling a professional art conservator is the smartest and safest thing you can do for your art.
The Art of Varnishing Your Acrylic Painting
To varnish or not to varnish? That’s a hot topic in the acrylic painting world, but if you’re serious about making your work last, it’s not really a debate. Think of varnish as the ultimate bodyguard for your art. It’s a final, sacrificial layer that protects the paint from everything the world throws at it—UV light, dust, and grime.
Varnishing isn't just about protection, though. It also pulls the whole piece together visually. Sometimes, acrylics can dry with a patchy finish, where some spots look glossy and others are flat and matte. A good coat of varnish evens all that out, giving your painting a consistent, professional sheen.
Here's the most crucial part: varnish is meant to be removable. Years down the line, when that protective layer has yellowed or collected too much dirt, a conservator can gently take it off and apply a fresh coat. Your original painting underneath? It remains untouched and as vibrant as the day you finished it.
Don't Skip the Isolation Coat!
Before you even think about varnishing, we have to talk about the one step that artists skip far too often: the isolation coat. This is a permanent, clear acrylic layer that goes on before the varnish. It acts as a permanent seal, creating a barrier between your painting and that final removable varnish.
Why is this so critical? Imagine trying to remove an old, yellowed varnish in the future. If you applied it directly to your painting, the solvents used to strip the varnish could easily lift some of your paint right off with it. The isolation coat prevents that disaster from ever happening.
For this, you'll want a soft gloss gel medium, which you’ll thin down with water. I find a ratio of two parts medium to one part water works perfectly. Mix them together gently (you don't want bubbles!) and let it sit for ten minutes or so. Then, apply it in a thin, even coat with a soft brush. Give it plenty of time to cure—up to three days—before you even think about moving on to the varnish.
Choosing Your Varnish: Sheen and Type
With your isolation coat fully cured, it’s time for the fun part: picking your finish. The choice between gloss, satin, and matte is mostly about aesthetics, but it will definitely change how your colors pop.
- Gloss Varnish: This finish makes colors look incredibly rich and saturated, almost like they're still wet. It's fantastic for bringing out the depth in dark passages, but be warned—it can create a serious glare under direct lighting.
- Satin Varnish: This is my go-to for most pieces. It’s the perfect middle ground, offering great color saturation with a lovely, subtle sheen that won't blind you with reflections. A truly versatile and popular choice.
- Matte Varnish: If you can't stand glare, matte is for you. It provides a completely flat, non-reflective surface. The trade-off is that it can sometimes lighten darker colors or slightly mute the overall contrast.
Varnishes also come in different chemical makeups. Polymer varnishes are water-based and pretty straightforward to work with. On the other hand, you have Mineral Spirit Acrylic (MSA) varnishes, which are solvent-based. They create a tougher film but require mineral spirits for thinning and cleanup, which means you need good ventilation. For most of us working at home, a quality water-based polymer varnish is the safer and easier option.
Whether you're just dusting or diving into a full varnishing job, the key is to start with the least invasive method first.

This cautious approach—dusting, testing, and then committing—is a core principle for any kind of art preservation.
Choosing the right varnish can feel overwhelming, but breaking it down by its properties makes the decision a lot clearer.
Varnish Options for Acrylic Paintings
| Varnish Type | Finish Options | Application Base | Removability | Best For |
|---|---|---|---|---|
| Polymer Varnish | Gloss, Satin, Matte | Water-based | Removable with ammonia | General use; easy cleanup and low odor. Great for indoor studios. |
| MSA Varnish | Gloss, Satin, Matte | Solvent-based | Removable with mineral spirits | A harder, more durable finish. Good for paintings that may be handled more or need extra protection. |
| Spray Varnish | Gloss, Satin, Matte | Aerosol (Solvent-based) | Removable with mineral spirits | Textured or impasto paintings where brushing might be difficult. |
Ultimately, the best choice depends on your specific painting and your working environment. For most artists, a high-quality polymer varnish is a fantastic and reliable option.
How to Apply Varnish for a Flawless Finish
Applying varnish can feel a bit high-stakes, but a little preparation makes all the difference. Make sure your workspace is as dust-free as possible and lay your painting completely flat.
Pro Tip: Whatever you do, do not shake the varnish bottle! Shaking creates a million tiny air bubbles that will get trapped in your finish and ruin the look. Instead, gently rock or swirl the bottle to mix it.
Grab a wide, soft, flat brush that you use only for varnishing. Dip it in and apply the varnish in long, even strokes, moving from one side of the canvas to the other. Overlap each stroke just slightly. The key is to work confidently and avoid going back over areas that have already started to tack up—that’s a recipe for streaks and cloudiness.
I always recommend applying two thin coats instead of one thick, gloppy one. Let that first coat dry completely (check the bottle for timing, but it's usually a few hours). Then, apply your second coat in a direction perpendicular to the first. This cross-hatching technique is a simple trick to ensure you get beautiful, even coverage.
Once you’re done, cover the piece to protect it from dust and let it cure for at least a full day. This final step is your ultimate gift to your artwork, ensuring it stays protected and vibrant for generations.
Smart Storage and Shipping Practices for Artwork
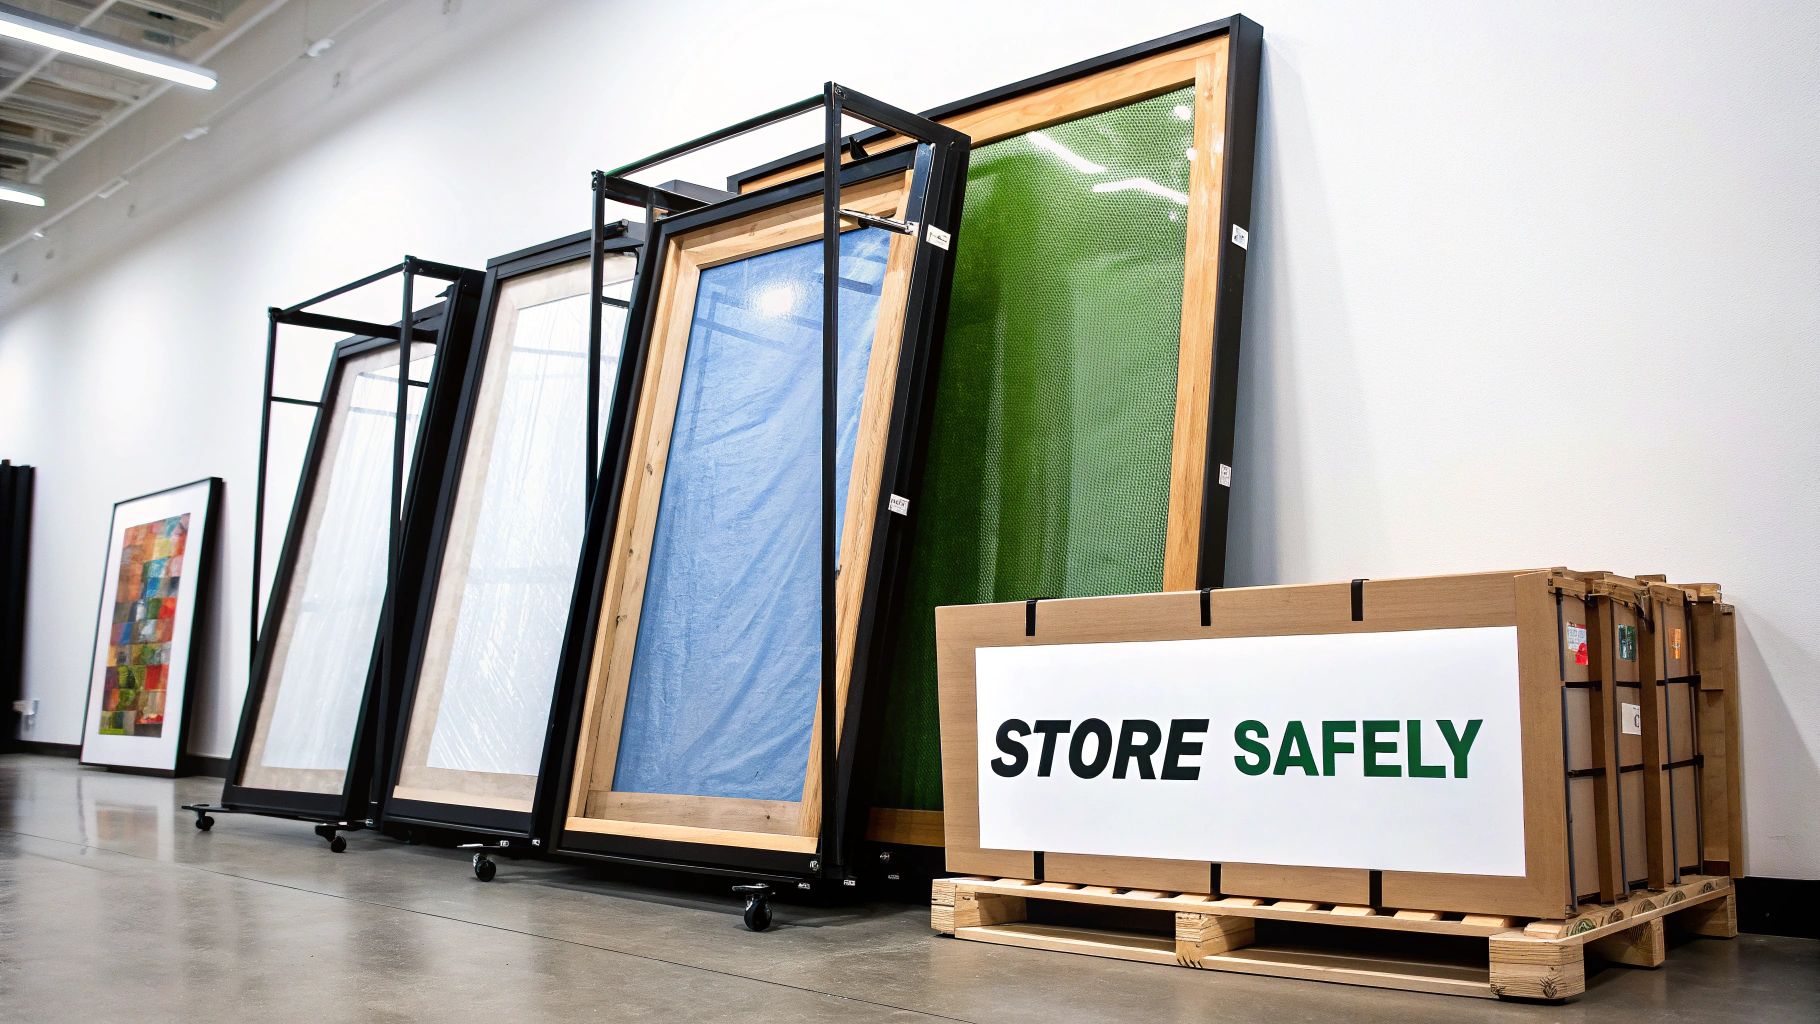
Sooner or later, every piece of art comes off the wall. Whether you’re an artist with a growing inventory, a collector rotating your display, or just moving to a new home, you’ll need to store or ship your paintings.
This is crunch time. Art is at its most vulnerable when it's being moved or put away. A few smart habits can be the difference between a painting that stays pristine for years and one that suffers from scratches, dents, or worse. Let's walk through how to keep your acrylic paintings safe and sound when they’re off-duty.
Best Practices for Storing Acrylic Paintings
Tucking a painting away is more involved than just leaning it against a wall in a spare room. The environment and even the position of the canvas are critical for its long-term health. The goal is to shield it from both physical harm and environmental stress.
The most common mistake I see is people stacking paintings flat, one on top of the other. This puts a ton of pressure on the bottom canvases, which can lead to ugly dents and warping. If two painted surfaces touch, they can even stick together, especially if the room gets a little warm.
Here’s how to do it right:
- Store Them Vertically: Always, always store your paintings standing up. Never lay them flat. Storing them on their edge on a padded surface prevents pressure from building up on the canvas.
- Use Spacers: If you need to line up several paintings, slip clean pieces of archival foam board or even sturdy cardboard between them. This creates a buffer so the painted surfaces never make contact.
- Wrap Them Properly: For short-term storage, a clean cotton sheet is great for keeping dust off. For anything longer, wrap the painting’s surface with acid-free glassine paper. It's a special, slick paper that won't stick to the acrylic paint.
A key thing to remember about acrylics is their thermoplastic nature. The paint film literally softens in the heat and turns brittle in the cold, making it incredibly sensitive to its surroundings. This is why good environmental control is just as important as how you physically handle the piece.
Creating a Safe Shipping Crate
Shipping a painting can be a nail-biting experience, but with the right packing method, you can be confident it will arrive in one piece. The biggest threats during transit are impacts, vibrations, and punctures. Your packing strategy has to defend against all three.
A huge—and shockingly common—mistake is wrapping bubble wrap directly on the painted surface. The plastic can trap moisture, and if it gets warm, the bubble pattern can permanently imprint itself onto the paint or varnish. A real nightmare.
Instead, think about creating a protective "shadow box" for your painting.
First, cover the surface with a sheet of that archival glassine paper. It’s your first line of defense.
Next, build a "collar" for the art using foam board strips cut to fit snugly around the canvas edges. This creates a gap that keeps any packing material from actually touching the face of the painting.
Finally, place this whole assembly inside a sturdy cardboard box that’s a few inches bigger than the painting on all sides. Fill that empty space snugly with packing peanuts or bubble wrap to cushion it against any bumps or drops. For a deeper dive into general best practices, learning how to pack fragile items for moving is a great starting point, as the core principles are the same.
The Importance of Framing for Protection
We usually think of frames as a finishing touch, but they play a massive role in protecting artwork, especially during storage and shipping. A good, solid frame acts like a bumper, absorbing minor knocks and preventing the canvas edges from getting scuffed up.
For the ultimate defense, framing a painting behind UV-protective acrylic glazing (like Plexiglas) is one of the best investments you can make. It shields the art from dust, accidental splashes, and the fading effects of UV rays. If you’re curious about doing it yourself, learning how to frame canvas paintings offers some fantastic insights into choosing the right materials for both display and defense.
Whether you're storing a piece for a month or shipping it across the country, a thoughtful approach is your best insurance policy. By using the right materials and a bit of care, you're helping to ensure your artwork has a long and vibrant life.
Common Questions About Protecting Acrylic Art
https://www.youtube.com/embed/16wCuMYD-8Q
Even when you follow all the rules for preserving your art, real-world situations pop up that can be a little confusing. I get asked about these tricky scenarios all the time, so let's tackle some of the most common questions artists and collectors have about keeping their acrylic paintings safe.
Think of this as your go-to guide for those "what if" moments that fall outside the usual cleaning or varnishing advice.
Can I Hang My Acrylic Painting in a Bathroom or Kitchen?
It's so tempting to hang a beautiful piece in a bathroom or kitchen, but my advice is simple: don't do it. These rooms are the absolute worst for artwork because of the wild swings in humidity. Steam from a hot shower or boiling pot of water creates a ton of moisture.
That moisture gets absorbed by the canvas, causing it to swell and shrink repeatedly. Over time, this cycle leads to a saggy, warped canvas. Worse, that damp environment is a perfect breeding ground for mold and mildew, which can permanently ruin your painting. It’s always better to find a spot with a stable, moderate climate.
What Do I Do If My Painting Gets a Small Scratch?
Seeing a scratch on a piece you love is gut-wrenching. The fix really depends on how deep it is.
If it's just a light, surface-level scuff on a varnished painting, you might be in luck. Sometimes, carefully applying a new, thin layer of gloss varnish right over the area can fill in the scratch, making it disappear. This only works if the scratch is just in the varnish and hasn't touched the paint.
For anything deeper—where you can see missing paint or the canvas is dented—stop right there. Your best and safest move is to consult a professional art conservator. Trying to patch it up yourself is a recipe for disaster. Matching the exact color, sheen, and texture is nearly impossible, and a bad touch-up can actually decrease the painting's value.
When in doubt, always err on the side of caution. An artist's well-intentioned repair can sometimes create a much bigger problem for a future conservator to fix. Professional intervention is a wise investment for cherished pieces.
Is It Safe to Roll an Acrylic Painting for Shipping?
Rolling a painting should be your absolute last resort. It puts a ton of stress on the paint film, but sometimes it's unavoidable. If you absolutely have to do it, you need to follow some strict rules to avoid damage.
First, make sure the paint is completely cured. For thick paint, this could take weeks or even months. When you're ready, always roll it with the painted side facing out. Rolling it inward compresses the paint and is almost guaranteed to cause cracking. Use a wide tube—I recommend at least 6 inches in diameter—and cover the painted surface with a sheet of acid-free glassine paper first.
Still, if you have the option, shipping a painting flat or still stretched is always the safer bet.
My Old Acrylic Painting Looks Yellow. Can This Be Fixed?
Yellowing is a classic problem with older art, and whether it can be fixed depends on what caused it.
More often than not, the culprit is an old varnish layer that has discolored from years of exposure to UV light and household pollutants. If that's the case, a professional conservator can work wonders. They can carefully remove the old, yellowed varnish and apply a fresh, modern layer, bringing the painting's original, vibrant colors back to life.
However, if the paint itself has yellowed (which can happen with cheaper, lower-quality acrylics), the damage is, unfortunately, permanent. This is exactly why using high-quality, professional-grade materials with built-in UV protection is so critical from the start.
At William Tucker Art, we believe that every piece of art tells a story worth preserving. Explore our collections of vibrant wildlife and pet portraits, created with the highest quality materials to ensure they last for generations to come. Find your next masterpiece at https://williamtuckerart.com.