
Ready to turn that beautiful canvas into a show-stopping centerpiece? I get it—the idea of framing your own art can feel a little daunting at first. But trust me, it's one of the most satisfying DIY projects you can tackle.
The right frame does so much more than just hang your art on the wall. It elevates the entire piece, protects it from the elements, and makes it feel like it truly belongs in your space.
Give Your Art the Finish It Deserves

Think of this guide as a friend walking you through the process. We're going to skip the confusing jargon and get straight to the practical stuff that actually works. We'll go from picking a frame that makes your artwork pop to the simple tricks for getting it secured perfectly.
Why Bother Framing Your Canvas?
Framing a canvas properly is about more than just looks. It provides crucial structural support, which is a big deal. Over time, changes in humidity and temperature can cause a canvas's stretcher bars to warp. A good frame prevents that from happening, especially for larger paintings or heirlooms you want to protect for years to come.
Of course, the frame is also the final brushstroke. It’s what completes the artistic statement, creating a beautiful transition between the painting and the wall. A great frame draws the eye right where you want it: on the art.
When you frame your own art, you get total creative control. You’re not stuck with generic, off-the-shelf options and can create a look that perfectly matches both the painting and your personal style.
We're going to dive into everything you need to know, focusing on practical steps that get you a professional finish without the headache. Let’s get rid of the guesswork.
Here’s what we’ll cover:
- Finding Your Style: We'll look at the sleek, modern feel of floater frames versus more traditional choices.
- The Right Tools for the Job: You don't need a full workshop. I’ll show you the essential tools you actually need.
- Putting It All Together: Learn how to secure your canvas so it’s snug and secure, with no rattling.
- The Finishing Touches: We’ll add the hanging hardware and dust covers that give it that true gallery look.
By the time we're done, you'll have the confidence and know-how to give every canvas in your home the polished finish it deserves.
Choosing the Perfect Frame Style for Your Art
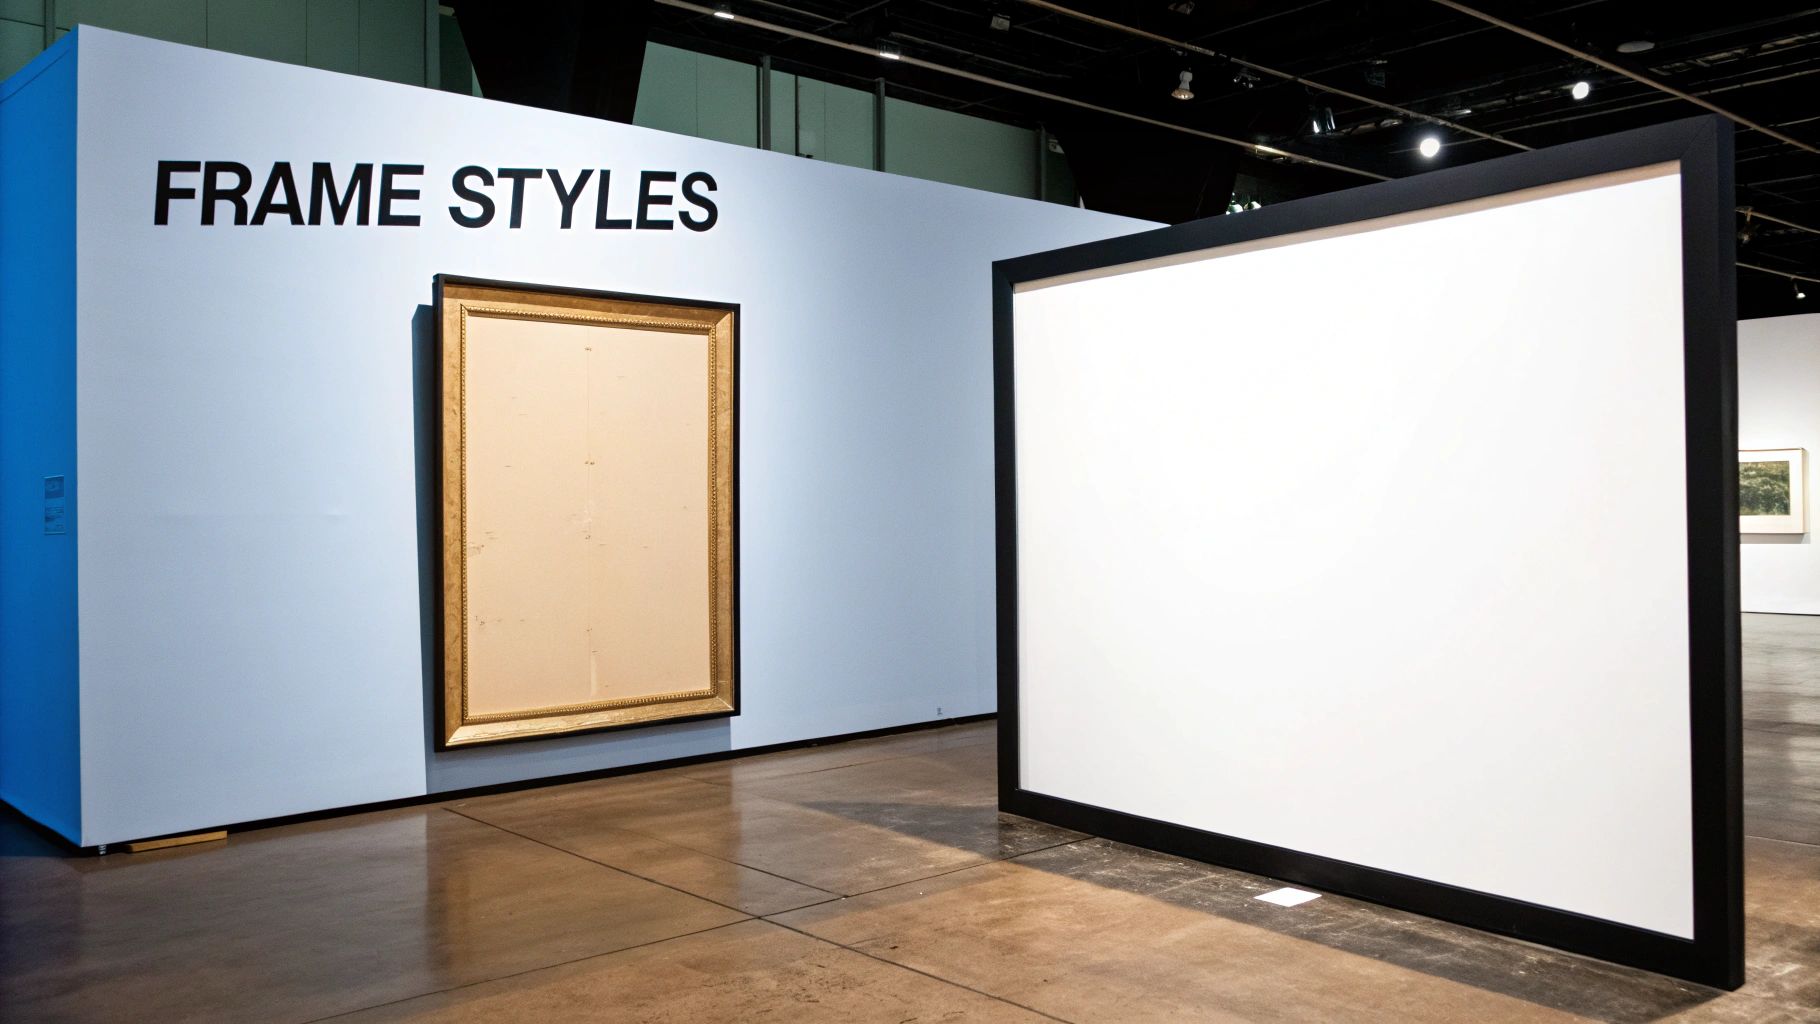
The frame you choose is so much more than a border—it’s the finishing touch that completes your artwork's story. It can either elevate the piece or detract from it, so picking the right style is key to making your painting look its absolute best.
There are a couple of go-to options when framing a canvas, and each one creates a totally different vibe. Let's break down the two most popular styles so you can feel confident you're making the right call.
Floater Frames: The Modern Choice
If you've spent time in contemporary art galleries, you've definitely seen a floater frame. This style has exploded in popularity, and for good reason. It creates a small, intentional gap between the canvas and the frame, which gives the cool illusion that your artwork is floating inside it.
This shadow gap is brilliant because it draws your eye right to the painting, without any distractions. It’s the perfect match for abstract or modern art, especially if you have a gallery-wrapped canvas where the artist painted the sides. A floater frame showcases those details instead of hiding them.
My takeaway: A floater frame says, "Look at the art, not at me." It’s an understated choice that adds a professional, gallery-quality finish while letting the painting be the star of the show.
Standard Frames: The Timeless Classic
Then you have the standard frame, the timeless classic we all know. This frame has a lip (called a "rabbet") that overlaps the front edge of the canvas by about a quarter-inch, neatly covering the sides. This creates a more traditional, contained look.
This is a fantastic option for more formal pieces like portraits or classic landscapes. Imagine a warm, ornate wood frame wrapping a rustic nature scene—it just works. Or a simple, sleek black frame giving a portrait that final touch of elegance. With a standard frame, you're thinking more about how the entire framed piece will harmonize with your room's decor. If you want more tips on that, we have a whole guide on how to choose wall art.
Floater Frame vs. Standard Frame: A Quick Comparison
Still on the fence? Sometimes seeing the options side-by-side makes the decision click. Here’s a quick rundown to help you figure out which style is the best fit for your specific painting and your personal taste.
| Feature | Floater Frame | Standard Frame |
|---|---|---|
| Appearance | Artwork appears to "float" within the frame with a shadow gap. | Frame lip overlaps the front edge of the canvas. |
| Best For | Modern, abstract, or contemporary art. Gallery-wrapped canvases. | Traditional art, portraits, landscapes. Works needing a formal border. |
| Canvas Sides | Exposes the sides of the canvas, making it part of the view. | Covers the sides of the canvas completely. |
| Overall Vibe | Minimalist, clean, and gallery-like. | Classic, formal, and decorative. |
Ultimately, the right choice comes down to the artwork itself and the look you're trying to achieve in your space. One isn't better than the other; they just serve different stylistic purposes.
It's clear people are investing more in creating beautiful spaces. The global canvas frames market was valued at US$ 4.8 billion in 2025 and is projected to climb to US$ 7.0 billion by 2032. There's also a cool trend toward sustainable materials like bamboo, which is great to see. You can dig into more of these stats about the canvas frames market on persistencemarketresearch.com.
Getting Your Tools Ready and Measuring Like a Pro
Any good project starts with getting your tools in order before you dive in. You don't need a full-blown workshop to frame a canvas, but having the right essentials on hand makes the entire process smoother and gives you that professional finish. It’s like prepping your ingredients before you start cooking—it just makes everything easier.
The basic toolkit is surprisingly simple. You'll need a trusty steel measuring tape, a sharp pencil for making your marks, and the right hardware to get that canvas snug in its frame. For most canvases, you'll be using offset clips. These are little Z-shaped metal brackets that hold the stretcher bars tight against the frame. Don't forget a screwdriver that fits the clip screws!
How to Measure Your Canvas Correctly
Listen, if there's one place you absolutely cannot afford to mess up, it's the measurements. A small error here can lead to a frame that's too big or too small, and that’s a mistake that costs both time and money. You need to capture three key dimensions: height, width, and depth.
- Height and Width: Place your canvas on a flat, stable surface. For the height, measure from the top outside edge all the way to the bottom outside edge. Do the same thing for the width, measuring from the left edge to the right. Always measure each dimension twice to be sure.
- Depth: This is the one people always forget! You need to measure the thickness of the stretcher bar—that’s the wooden frame the canvas is stretched over. This measurement is crucial because it tells you the "rabbet depth" needed for your frame. You want the canvas to sit flush inside, not stick out the back.
Here's a pro tip: Never assume your canvas is perfectly square. They rarely are. Always measure both the left and right sides for height, and the top and bottom for width. Use the larger of the two measurements when you go to order or build your frame.
Taking the time to get this right matters. Proper framing is a huge deal, and it's a big reason why the global picture frame market was valued at around USD 9.33 billion in 2023. The growth in this market shows just how much people value protecting and displaying their art well. You can learn more about the global picture frame market on zionmarketresearch.com.
If you're building the frame yourself and want those perfect 45-degree corners, a precision tool like a digital angle rule is an absolute game-changer. Once you have your accurate measurements and your tools laid out, you're ready to move on.
Bringing It All Together: Assembling Your Frame and Canvas
Alright, you’ve got your tools, you've checked your measurements (twice!), and now for the best part—seeing it all come together. This is that satisfying moment when your beautiful painting and the perfect frame finally become one. With a bit of care, you'll get a professional-looking result that you can be proud of.
First, let's set up your workspace. Find a big, flat surface—a dining table or even a clean spot on the floor will do. Lay down a soft towel or a blanket to protect both the frame's finish and the front of your artwork from any accidental scratches.
Now, gently place the frame face down on your soft surface. Carefully lower your canvas, also face down, into the frame's opening. You're looking for a snug fit. It shouldn't be so tight that you have to jam it in, but it shouldn't be loose and rattling around, either.
This infographic gives you a great visual overview of the tools and the general workflow.
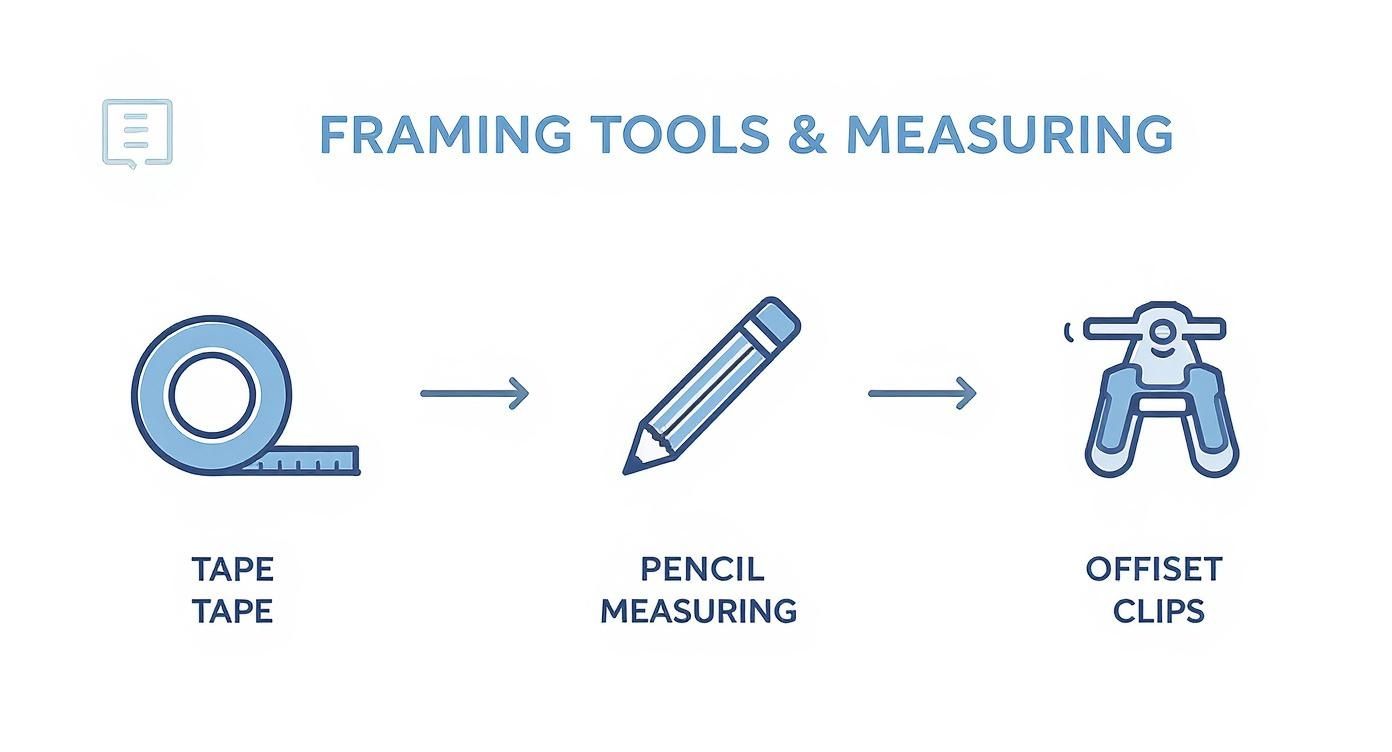
As you can see, it all comes down to careful measuring, marking your spots, and using the right hardware to get a secure fit.
Securing the Canvas in Place
So, how do you lock the canvas into the frame? For most stretched canvases, your best friends are offset clips. These are little Z-shaped metal brackets made specifically for this job. They brilliantly bridge the gap between the canvas stretcher bar and the frame, holding everything together nice and tight.
Here's how I install them:
- First, position a clip so one end sits flat on the back of the stretcher bar and the other end rests on the frame.
- Use a pencil to mark where the screw will go into the frame. I always recommend drilling a tiny pilot hole first. It only takes a second and helps prevent the wood from splitting, which is a real lifesaver with nice hardwood frames.
- Next, drive a small screw through the clip and into your pilot hole. Don't crank it down all the way just yet.
For a standard painting, say a 16x20 inch piece, I usually put two clips on each side, a few inches from the corners. If you're working with something larger, add an extra clip in the middle of each of the longer sides for good measure. Once all the clips are in, go back and tighten each screw until the canvas is secure and doesn't wiggle.
Fixing Common Assembly Hiccups
Even the most experienced framers run into little issues now and then. Don't sweat it! Most problems are a quick and easy fix.
- There’s a small gap behind the canvas: If your canvas sits a bit too deep in the frame, just cut a few small squares of foam core board or cardboard. Tuck them behind the stretcher bars to act as shims. This will push the canvas forward so it sits flush with the front of the frame.
- The canvas feels wobbly: This almost always means your offset clips aren't tight enough, or they're the wrong size. Clips come in different depths (like 1/8", 1/4", and so on). You need to make sure you have the right size to create firm, even pressure against the canvas.
A good rule of thumb is to aim for a "snug but not strained" fit. You want the canvas held firmly with zero movement, but you don't want to apply so much force that you risk warping the stretcher bars or the frame itself.
An alternative you might see are framer's points. These are tiny metal tabs you can push or shoot into the inside lip of the frame to hold the canvas. While they work, I find that for most DIY projects, offset clips give you a much more secure and adjustable hold.
Applying Finishing Touches for a Professional Look
You're in the home stretch! It's these last few steps that really separate a DIY job from a truly professional, gallery-worthy piece. We'll start with the back of the frame, which, in my experience, is just as important as the front.
Adding a paper dust cover is such an easy win. This simple backing gives your work a clean, polished look while protecting the canvas from dust, bugs, and other debris over the years. It’s a small detail that shows you care about the finished product.
Adding Hanging Hardware
Alright, let's get this thing ready for the wall. The hardware you choose really depends on the size and weight of your artwork.
- Sawtooth Hangers: These are my go-to for smaller, lighter frames. They're super easy to install—just find the center of the top frame rail and gently hammer it in. Simple and effective.
- D-Rings and Picture Wire: For anything medium to large, this combo is the way to go. It’s far more secure. I typically place one D-ring on each side rail, about a third of the way down from the top.
Once the D-rings are screwed in, stretch your picture wire between them. You want a little bit of slack, but not too much. A good rule of thumb is to make sure the peak of the wire, when pulled taut, sits a couple of inches below the top edge of the frame. This helps the artwork hang flat and stay level.
With your masterpiece all framed up, the final step is finding the perfect spot to display it. If you're dealing with a really heavy piece or a complex gallery wall and are in the Toronto area, you might consider professional art hanging services to get it just right.
Pro Tip: Want to hang your art like a gallery? The secret is to aim for the ideal eye-level height. Position the center of your artwork about 57 inches from the floor. It makes a world of difference.
The appreciation for art in home decor has really exploded, creating a huge market. In fact, frames for canvas paintings were valued at around USD 2.1 billion in 2023.
Once you’re done, you’ll probably want to take some great pictures of your work. For pointers on that, check out our guide on how to photograph artwork for prints.
Got Questions About Framing a Canvas? We've Got Answers
Even when you have a plan, a few questions always seem to pop up right in the middle of a project. That's just part of the process! Learning how to frame your own canvas art means figuring out these little details as you go. Let's tackle some of the most common ones I hear so you can keep things moving.
A big one is whether you can frame a canvas that has painted edges. The answer is a definite yes! In fact, a floater frame is your best friend here. It’s specifically designed to leave a small gap, beautifully showcasing the sides of your canvas and turning those painted edges into a feature.
Should I Put Glass Over a Canvas Painting?
This question comes up all the time. The short answer is no, you generally don't need glass for canvas paintings.
Oil and acrylic paints are quite durable and actually need to "breathe." That's why a good coat of varnish is the go-to for protection, not a sheet of glass. Glass can trap moisture against the paint's surface, which can cause serious damage over time—something you definitely want to avoid.
What if your canvas is a little warped?
Don't sweat it. A slight warp is often fixable during the framing process. As you secure the canvas with offset clips, apply gentle and even pressure. This will help pull the canvas flush against the frame, giving you that flat, professional finish. If it's a bit more stubborn, simply adding a few extra clips can work wonders.
At William Tucker Art, we believe every piece of art deserves a finish that makes it shine. Explore our collections of wildlife and pet portraits to find the next masterpiece for your walls.