
Before you can even think about capturing the wild spirit of an animal on canvas, you’ve got to get your studio in order. Having the right tools isn’t about buying the most expensive gear; it's about building a smart, reliable toolkit that works for you. With the right setup, you can paint everything from the softest fur to the sharpest claw.
Let’s get your workspace ready for action.
Your Essential Toolkit for Animal Painting
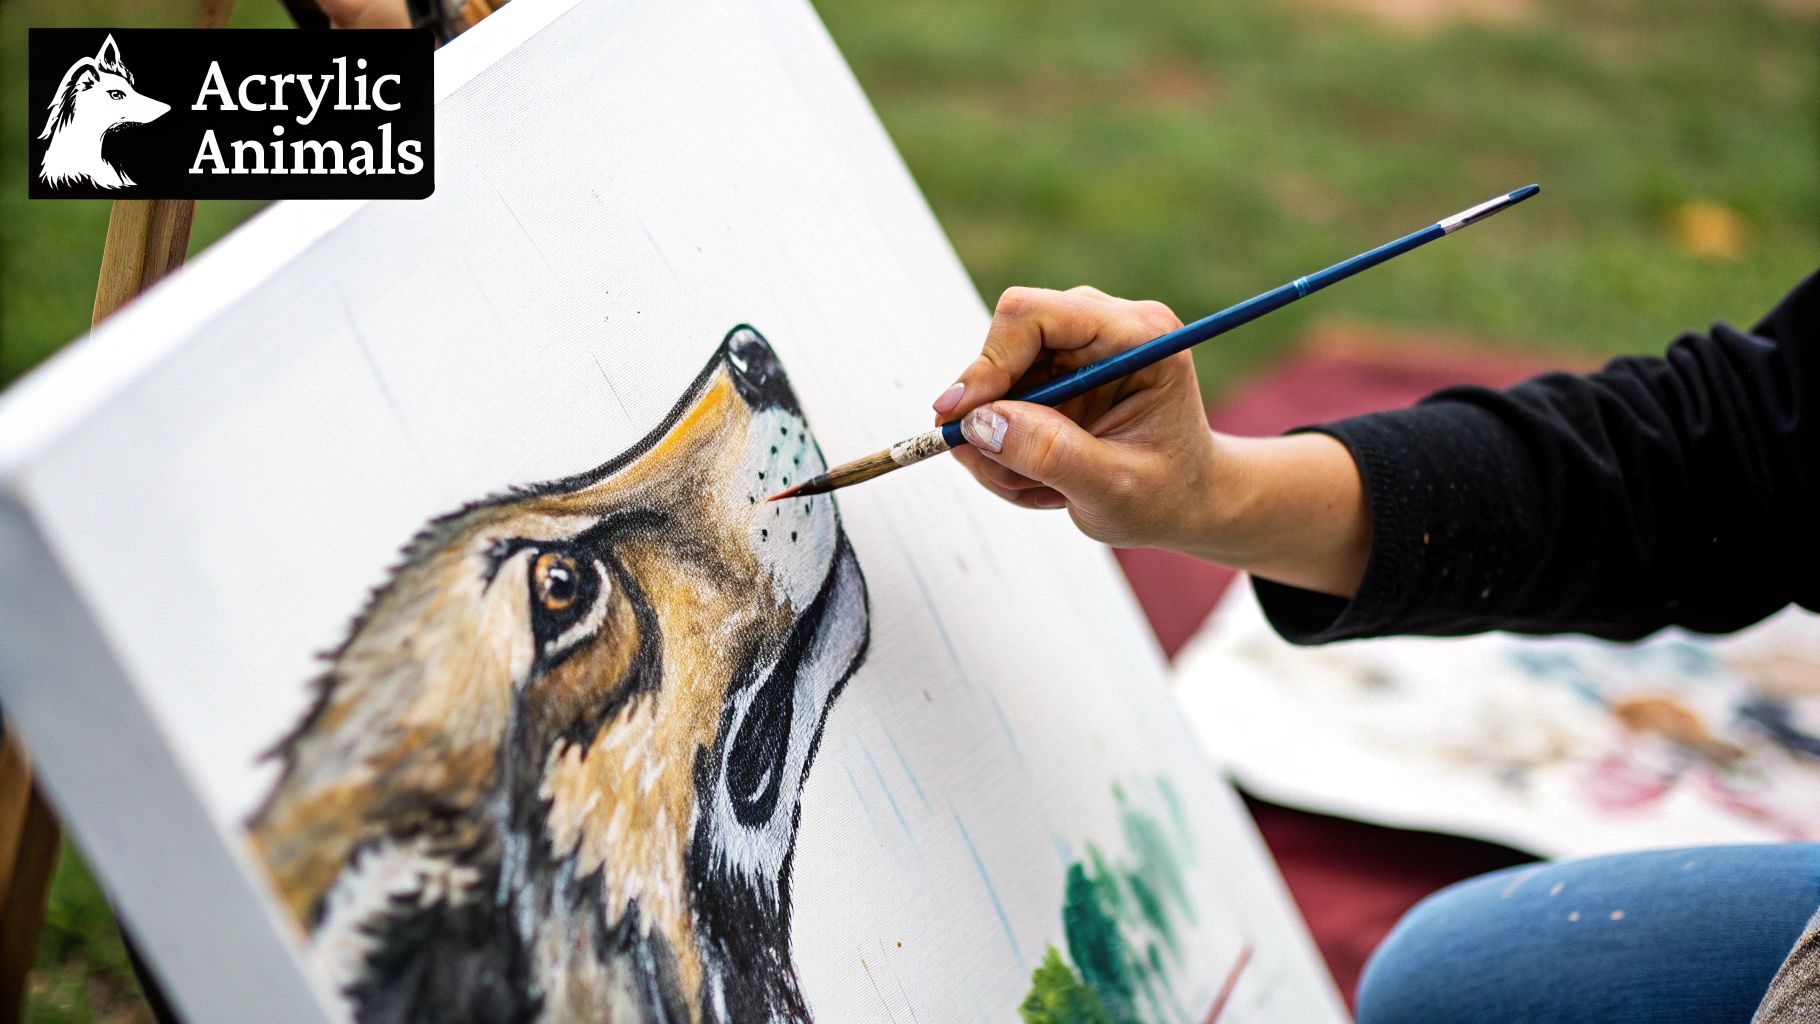
Before a majestic lion or a playful puppy can come to life, your studio needs to be set for success. When you have the right materials within arm's reach, frustration melts away, and your creativity can really take over. This isn't an endless shopping list—it's a handpicked selection of essentials that will become your trusted companions.
Believe me, the quality of your supplies makes a world of difference. Professional-grade paints, for example, have a higher pigment load and better lightfastness, which means your artwork stays vibrant for years. It's a big deal. The market for artist-grade acrylics was valued at around USD 535.4 million back in 2021 and keeps growing, which just goes to show how many artists depend on quality materials.
To make things simple, I've put together a quick guide to the must-have supplies you'll want on hand.
Essential Supplies for Your Animal Painting Studio
| Supply Item | Recommended Type | Why It's Important |
|---|---|---|
| Acrylic Paints | Heavy Body & Fluid Acrylics | Heavy Body is thick and perfect for texture (think fur or manes). Fluid is thinner and ideal for fine details like whiskers or the glint in an eye. |
| Paint Brushes | Fine-Point Round, Filbert, Flat | The round brush is your go-to for detail. A filbert is a workhorse for blending. The flat brush is for blocking in large areas quickly. |
| Painting Surface | Stretched Canvas or Wood Panel | Canvas is a classic, but smooth wood panels are fantastic for hyper-realistic details where you don't want canvas texture getting in the way. |
| Palette | Stay-Wet Palette | A game-changer. It keeps your acrylics from drying out too fast, saving you paint, money, and a lot of stress during long painting sessions. |
This table covers the basics, but let's dive a little deeper into what makes each of these so crucial for painting animals.
Choosing Your Acrylic Paints
Walking into an art store can be overwhelming with all the choices. For painting animals, I lean heavily on two kinds of acrylics:
-
Heavy Body Acrylics: These have a thick, buttery feel, almost like oil paint. They hold their shape and are perfect for creating visible brushstrokes. I use them all the time for building up the texture of thick fur, shaggy manes, or rough animal hides.
-
Fluid Acrylics: With a consistency more like heavy cream, these are my secret weapon for fine details. They flow smoothly off the brush, making it easy to paint individual hairs, delicate whiskers, or those tiny, captivating highlights in an eye.
Don't feel like you need every color under the sun. Start with a solid, basic palette. A tube of Titanium White, Mars Black, Cadmium Red, Ultramarine Blue, Cadmium Yellow, and Burnt Umber will let you mix just about any color you can imagine.
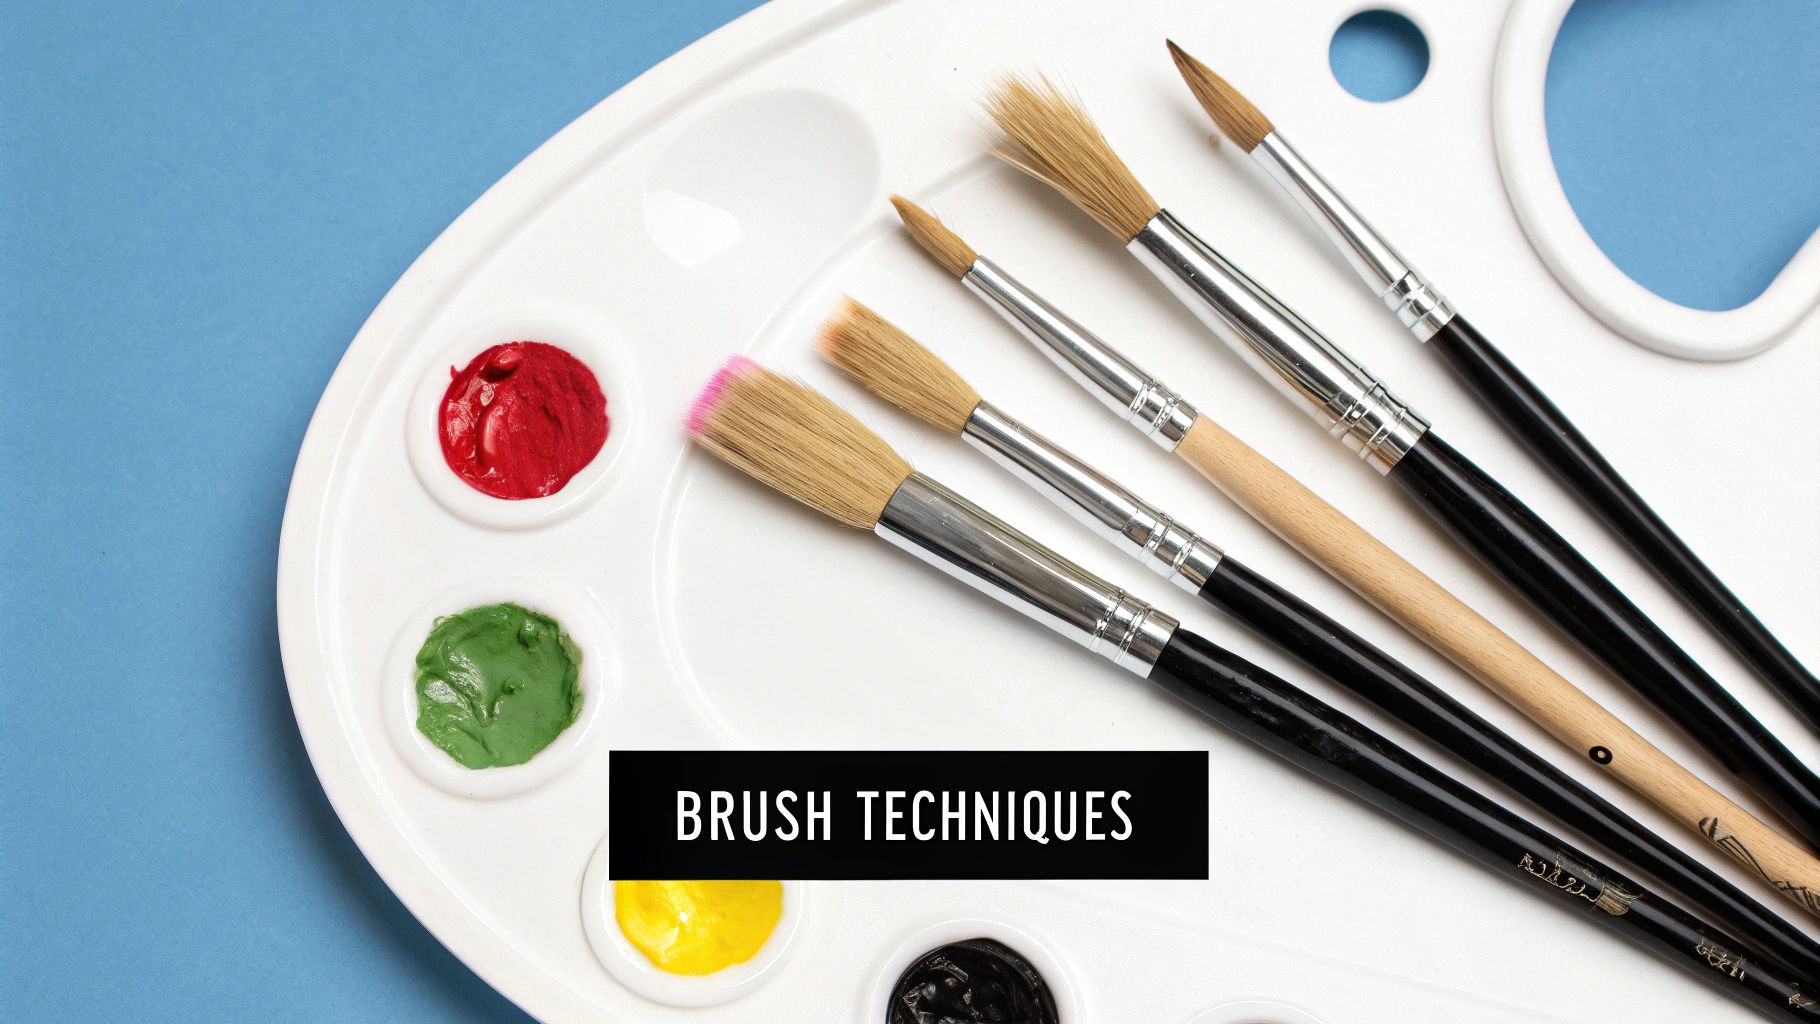
Selecting the Right Brushes
Your brushes are where the magic happens—they're your primary storytellers. Different shapes create wildly different effects, so having a small, versatile set is key.
Here’s a great starting lineup:
- A Fine-Point Round: This is non-negotiable for detail work. It’s what you’ll use for eyes, whiskers, and those fine strands of fur that bring an animal to life.
- A Filbert: With its oval shape, a filbert is a master of blending. It’s fantastic for creating the soft, rounded forms of an animal's body and smoothly transitioning between colors.
- A Flat Brush: Reach for this when you need to cover larger areas, like the background or the initial block-in of your animal’s main shape.
Pro Tip: Never throw away your old, frayed brushes! A beat-up brush can be the absolute best tool for stippling or scumbling textures. They're perfect for creating the look of coarse fur or weathered skin.
Finding the Perfect Surface
While traditional stretched canvas is always a solid choice, it’s not your only option. The texture of your surface—often called its "tooth"—can dramatically change how the paint behaves and how much detail you can achieve.
For highly detailed animal portraits, I often prefer a smoother surface. Wood panels are a personal favorite. They provide a rigid, smooth base that lets you create crisp lines and tiny details without the weave of the canvas getting in your way. Just remember that properly preparing these surfaces is vital for a lasting piece of art. If you're curious about that process, you can find some great advice in our guide on preparing cradled wood panels for acrylic painting.
Finally, do yourself a favor and get a stay-wet palette. Acrylics are notorious for drying quickly, and this simple tool will keep your paints workable for hours, sometimes even days. It prevents waste and makes color mixing a much more relaxed process.
Getting the Anatomy and Form Just Right
Let’s be honest, the real magic in making an animal painting feel alive isn’t just about getting the fur texture perfect or that little glint in the eye. It goes much deeper than that—right down to the bone and muscle underneath. When you get a feel for the animal's anatomy, your painting suddenly has weight, presence, and a sense of movement. It stops being a copy and starts feeling like a real creature.
A common pitfall, especially for newcomers, is to lean too heavily on tracing a photo. While tracing can give you a starting point for proportions, it often creates flat, lifeless paintings. Why? Because it skips over the most important part: understanding why the animal is shaped the way it is. The goal isn't just to mimic lines; it's to interpret form.
The most believable animal paintings are always built on a solid understanding of anatomy. Once you see the simple shapes and structures under the skin, you can paint that animal with confidence and make it look authentic, even if your reference photo isn't perfect.
Break It Down: Seeing Simple Shapes in Complex Animals
Tackling complex anatomy can feel overwhelming, but the trick is to simplify. Seriously, every animal—no matter how detailed—can be broken down into a handful of basic geometric shapes. Think of it like building with blocks before you start carving the details. This is your first move toward creating a dynamic, well-proportioned foundation.
Let's take a wolf, for instance. Looks complicated, right? But if you squint a little, you start to see the basic structure:
- The Head: It’s really just a circle for the main skull with a triangle or rectangle tacked on for the snout.
- The Body: I usually see this as two big ovals or circles. A larger one for that powerful chest and ribcage, and a slightly smaller one for the hips.
- The Legs: These are just a series of connected cylinders and ovals. The key here is paying close attention to the angles of the joints.
By sketching out these simple forms first, you're essentially creating a map of the animal’s major masses. It forces you to see the animal as a 3D object from the get-go and ensures your proportions are solid before you even think about picking up a brush.
Using Your Reference Photos the Smart Way
Reference photos are indispensable, but their real power isn't just showing you which way the fur grows. A good photo is a masterclass in light and shadow. It shows you exactly how light wraps around the animal's form to create dimension.
So, instead of just copying what you see, really analyze it. Ask yourself: Where's the light coming from? Which muscles are catching the brightest highlights, and where are the deepest shadows falling?
This is what allows you to convincingly sculpt the form with paint. When you're working with acrylics, these patterns of light and dark are what trick the eye into seeing roundness and depth. For a really deep dive into this, we’ve put together a complete guide on using animal anatomy for artists that you might find helpful.
From Rough Sketch to Refined Drawing
Once you’re happy with your blocky, geometric sketch, it's time to start connecting those shapes and refining them into a more natural, organic form. This is where you let your lines flow to create that unique silhouette. Think about the powerful arch of a wolf’s back, the subtle dip where the neck joins the shoulders, or the muscular haunches ready to pounce.
As you refine the drawing, zero in on these key anatomical landmarks:
- Shoulder Blades and Hips: These are huge for getting the posture right. Placing them accurately gives your animal a believable stance.
- The Spine: Even though you can't see it, feeling the curve of the spine helps you create a pose that feels natural and full of energy, not stiff.
- Major Muscle Groups: Just lightly hinting at the big muscles in the legs, chest, and shoulders adds an incredible sense of power and form.
I like to sketch this final outline right onto my canvas, either with a light pencil or some thinned-down neutral paint. This becomes my roadmap for the entire painting. Trust me, spending a little extra time on this foundational drawing is the single most important thing you can do to make your final piece feel less like a picture and more like a living, breathing animal.
Building Your Painting, Layer by Layer
Alright, your sketch is down, and the blank canvas is calling. This is where the magic really starts. The secret to a rich, lifelike animal painting isn't about getting the perfect color on the first try. It's about patience and building up your painting in layers, almost like a sculptor adding bits of clay.
This layering method is one of the best things about working with acrylics. It lets you build a solid foundation that makes all the details you add later really pop. It’s what transforms a flat, cartoony shape into something that feels like it could walk right off the canvas.
Blocking In Your Foundational Colors
The very first thing I do with paint is what’s called blocking in. Don’t overthink this part! You're essentially creating a simple, colorful map of your subject. The goal is just to cover the canvas with flat shapes of the main colors and values you see, not to get bogged down in details.
For instance, if I were painting a tortoiseshell cat, I'd mix a general mid-tone brown for its body, a darker brown for the stripes, and a light cream for its chest and paws. Using a medium flat brush, I'd just fill in those areas. Forget about fur texture for now; we're just establishing the big picture.
This step immediately gives you a feel for the composition and shows you how the color masses are working together. It's a fantastic, low-pressure way to get started.
The Power of an Underpainting
Once that initial block-in is dry (which takes no time at all with acrylics), many artists, myself included, move on to an underpainting. This is a thin, monochromatic layer—usually in a single color like Burnt Umber or a mix of blues and browns—that you use to define all your light and shadow patterns.
This is where you start to really sculpt the animal’s form. By focusing only on value (how light or dark an area is), you create a sense of three-dimensionality that will make your final colors feel so much more vibrant and real.
Your underpainting is the secret sauce that makes your final colors sing. By establishing the shadows and highlights early on, you give your top layers a built-in roadmap for light and form, preventing your painting from feeling flat.
This technique is a game-changer. For our tortoiseshell cat, I’d take some thinned-down Burnt Umber and deepen the shadows under its chin, along its belly, and where its legs meet its body. With just that one step, the cat suddenly has weight and volume before you've even applied any of its "real" colors.
The Golden Rule: Work from Dark to Light
Here’s a fundamental principle for painting with acrylics: always work from dark to light. This is probably the biggest difference between acrylics and watercolors. With acrylics, you want to lay down your darkest shadows and mid-tones first, then gradually build up toward your brightest highlights.
Why is this so critical? Because acrylics are opaque, meaning lighter colors can easily cover darker ones. If you start with your whites and light yellows, you'll end up with a muddy mess when you try to paint shadows over them.
Here's how that process usually looks on my easel:
- Deepest Darks First: I start by reinforcing the deepest shadows I mapped out in my underpainting. For the cat, this might be its dark stripes or the cast shadow it’s throwing on the floor.
- Move to Mid-Tones: Next, I'll paint the main "local" colors over the underpainting, allowing some of those darks to peek through. This is where I'd lay in the cat’s primary brown and orange patches.
- Layer in Lighter Tones: Now I can start adding the lighter shades that show where the light is hitting the form. Think of the lighter brown on the cat’s back or the cream-colored fur on its chest.
- Finish with Highlights: The very last thing I add are the brightest pops of light—that little glint in the eye, a sunlit whisker, or the shine on a wet nose.
Following this dark-to-light progression keeps your colors clean and your painting looking vibrant. It's no wonder acrylic-based paints are so dominant, making up 36.26% of the entire global paints market. For more on this, you can find market insights for paints and coatings that show just how widespread they are. Their opacity is a huge advantage, and by working from dark to light, you're using the medium’s best quality to create a painting with incredible depth.
Breathing Life into Fur, Feathers, and Scales
Texture is what turns a flat image into a living, breathing creature on your canvas. It's the secret sauce that makes you want to reach out and touch the soft fur of a fox or feel the slick, bumpy skin of a lizard. But here’s a little secret: painting realistic texture isn’t about drawing every single hair or scale. It’s about creating an illusion.
The magic of acrylics is how beautifully they adapt to this task. Their versatility is a huge reason the global acrylic paints market hit around USD 138.46 million and keeps climbing. For artists painting animals, that quick-drying nature is a godsend for building up the convincing layers that texture requires. You can learn more about the acrylic paints market growth and see how it’s empowering artists everywhere.
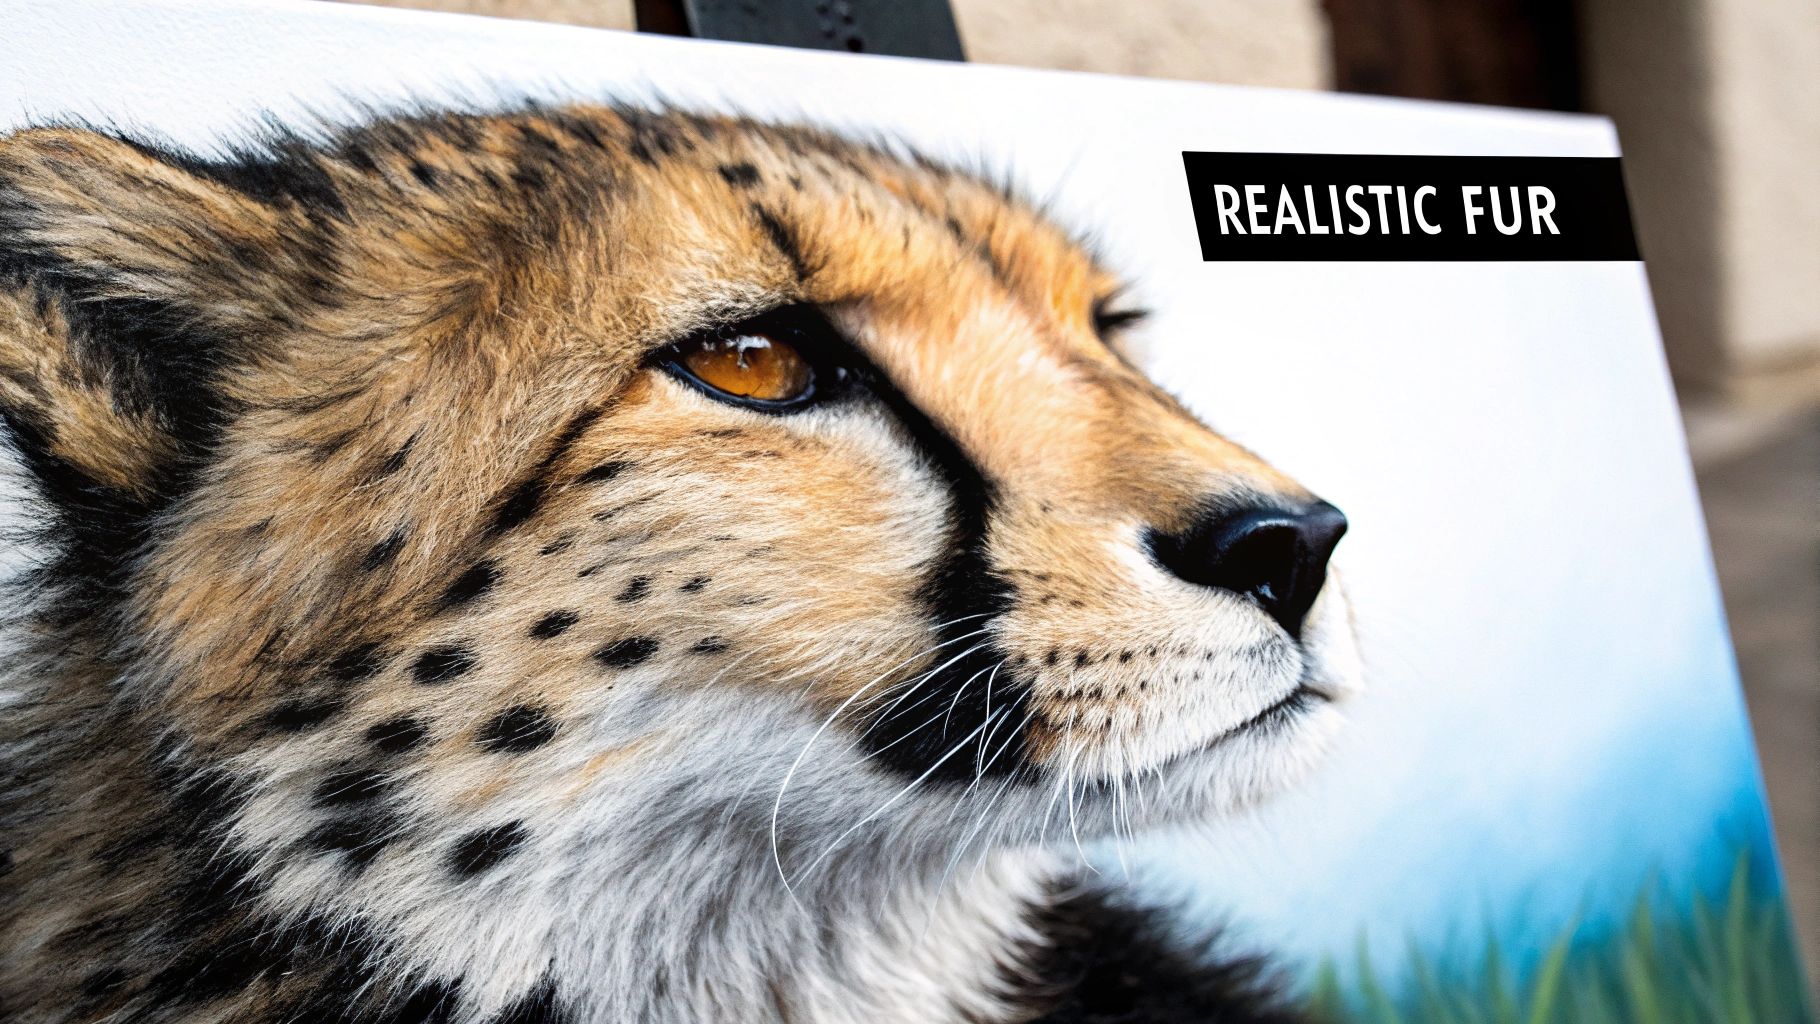
The Secrets to Painting Lush, Realistic Fur
When it comes to fur, think in layers and always follow the flow. A classic beginner mistake is jumping straight in with a tiny brush to paint individual hairs. Instead, you have to build the foundation first by seeing the fur as large shapes of color and shadow that hug the animal's form.
Start by blocking in the darkest values. If you're painting a grizzly bear, this might be a deep, raw umber or even a mix of black and brown. Let that dry completely. Next, grab a filbert or flat brush and a slightly lighter mid-tone color. Following the direction the fur grows, start laying in these bigger sections. This step is what gives the animal its shape and sense of movement.
The tiny, delicate details come last. This is where a rigger brush or a fine-point round brush really shines. Load it up with a light color, get a feel for the flicking motion, and gently add in those bright highlights and stray hairs that catch the light.
A Little Trick I've Learned: Don't limit yourself to traditional brushes. An old, frayed brush or even a fan brush can be amazing for stippling or dry brushing those soft, downy undercoats you see on animals like wolves or fluffy cats.
Want some low-pressure practice? Try painting a single feather you found on a walk or a small swatch of faux fur. It’s a great way to get a feel for how the layers work together without the stress of a full portrait.
Capturing the Elegant Structure of Feathers
Feathers are a whole different ballgame. They’re a beautiful mix of soft, fluffy edges and a strong, defined structure. The trick here is to use clean, confident brushstrokes that all move in the same direction. Unlike the somewhat chaotic nature of fur, feathers have a very clear, organized pattern.
First, paint the solid shape of the wing or the bird’s body with a base color. Then, using a small flat or filbert brush, begin laying in the individual feather shapes. Always work from the bottom up, layering them just like they overlap in real life. Each brushstroke should be deliberate and follow the natural curve of the feather.
To get that stunning iridescence you see on hummingbirds or peacocks, don't just mix a single color on your palette. Instead, lay down strokes of different colors right next to each other. For a bluebird’s feather, you might place strokes of deep blue, a touch of turquoise, a hint of purple, and maybe even a tiny fleck of green side-by-side. From a distance, they blend together to create a gorgeous shimmering effect.

As the chart shows, while nothing beats seeing an animal in person, having high-quality photos is often the most practical and powerful tool for capturing these intricate details. For an even deeper dive, check out this guide on how reference sources can improve your art.
Simulating the Cool, Bumpy Texture of Scales
Painting reptiles and fish is so much fun because you get to play with light and repeating patterns. The goal isn't to outline every single scale—that would look flat and unnatural. Your job is to suggest the pattern and create the illusion of a bumpy, often reflective surface.
A brilliant technique for this is called scumbling. After you've laid down your base colors, grab a dry, stiff brush and dip just the very tip in a lighter color. Now, scrub the brush over the canvas in a circular, energetic motion. This technique deposits little broken patches of paint, which creates a fantastic scaly look almost instantly.
What about that wet shine on a fish? Easy. Let your base layers dry completely. Then, with a small round brush and some bright white paint, add a sharp, crisp highlight to the top curve of some of the scales. This one simple step will immediately make the surface look wet, glossy, and three-dimensional.
To help you get started, here's a quick cheat sheet for matching your technique to the texture you're trying to create.
Techniques for Different Animal Textures
| Texture Type | Key Brushes | Painting Technique | Pro Tip |
|---|---|---|---|
| Fluffy Fur | Fan brush, old stiff bristle | Layering from dark to light; use dry brushing for soft edges. | Always paint in the direction of hair growth to create movement. |
| Sleek Feathers | Small flat, filbert | Use clean, overlapping, and directional strokes. | Place different hues side-by-side to create an iridescent sheen. |
| Bumpy Scales | Stiff round, old flat brush | Scumble a lighter color over a dark base with a dry brush. | Add small, sharp white highlights to make scales look wet and shiny. |
These are just a few starting points, of course. Don't be afraid to experiment! Try combining these methods to give your paintings an incredible sense of realism that will draw your viewers in and make them feel like they could almost touch the creature on your canvas.
The Final 10% - Making Your Animal Breathe
This is where the magic happens. After all the patient layering of colors and textures, the last ten percent of the work is where you breathe life into your painting. These final, deliberate details are what will transform a technically good painting into something truly captivating. This is how you give your animal its soul.
For me, it almost always starts with the eyes. They're the absolute focal point, the one thing that forges a real connection with the person looking at your art. A flat, lifeless eye can suck the energy out of the entire piece, no matter how beautifully you’ve rendered the fur.
Painting Eyes That Have a Spark
To get that deep, alive feeling in an eye, you have to think in layers, just like we did with the fur. I always begin by painting the entire eyeball with a dark base, usually a mix of black and Burnt Umber. Straight black can look like a void, so mixing it gives it a more natural depth.
From there, I build up the color of the iris. Using a tiny round brush, I apply thin glazes of color, making sure to leave the outer edge nice and dark. If I'm painting a brown dog's eye, for instance, this means layering shades of sienna, ochre, and maybe even a hint of orange to get that rich, complex color.
Now for the most important part: the catchlight. This tiny dot of pure white paint is the reflection of the light source, and it's what sells the entire effect. I place it very carefully on the upper part of the iris, often letting it overlap the pupil just a bit. It’s amazing how this one little dot makes the eye look wet, round, and full of life.
Adding Whiskers and Other Delicate Touches
Whiskers can feel so intimidating. One shaky stroke and you feel like you’ve ruined everything! The secret is a combination of confidence and the right tool. My go-to is a long, thin brush called a rigger. I thin my white paint until it has the consistency of ink, then execute each whisker with one quick, decisive flick of the wrist.
Seriously, practice this on a scrap canvas first. Start with firm pressure right where the whisker grows from the face, then lift the brush as you flick it outward. This creates that perfect, natural taper from a thicker base to a paper-thin tip.
You can apply that same principle to other fine details:
- Eyelashes: A fine liner brush and some dark paint are all you need. Just a few subtle, delicate lashes are far more effective than a heavy-handed approach.
- Wet Noses: To get that signature wet-nose look, add a few sharp, bright white highlights along the top curves of the nostrils and the very bottom edge of the nose.
- Claws: A single, sharp highlight painted along the top edge of a claw instantly makes it look hard and sharp.
The most convincing details are often the most understated. A single, perfectly placed highlight or a confidently painted whisker does more to create realism than a dozen overworked, hesitant brushstrokes.
Grounding Your Animal with Shadows
Remember, your animal doesn't exist in a white void. To make it feel like it's truly part of its environment, you need to paint a believable cast shadow. This is what anchors the subject to the ground, giving it weight and a real sense of place.
Look at your reference photo to see where the shadows fall. I mix a shadow color—usually a cool grey or a muted purple, almost never pure black—and lightly paint it beneath the animal. The key is to make the shadow darkest right where the paws or body touch the ground, then let it soften and lighten as it stretches away.
It's a simple step, but the amount of realism it adds is incredible. Suddenly, you've created a convincing three-dimensional space for your animal to live in.
The Final Seal: Protecting Your Work with Varnish
This last step is non-negotiable for me. Once your painting is completely dry—and I mean completely, so give it at least 72 hours—it's time to varnish. Applying a coat of good-quality artist varnish does two crucial things.
First, it protects all your hard work from dust, UV light, and grime, keeping your colors vibrant for decades. Second, it unifies the painting's sheen and dramatically deepens your darks, making the entire piece pop. Whether you prefer a matte, satin, or gloss finish, this final coat is the professional touch that officially completes your masterpiece.
Common Questions About Painting Animals in Acrylic
Whenever you dive into something new, a few questions are bound to pop up. Trust me, we’ve all been there! Let's tackle some of the most common hurdles I see artists face when they start painting animals with acrylics. Getting these sorted will really help you paint with more confidence.
How Do I Keep My Acrylic Colors from Looking Muddy?
Ah, the dreaded muddy colors. This is easily the most common frustration when you're starting out, but the good news is, it's totally fixable. The main culprit is usually over-blending wet colors right on your canvas.
It also happens when you mix too many pigments together on your palette. As a good rule of thumb, try to stick to mixing no more than three colors at a time (plus white, of course). Keeping your mixes simple is the secret to keeping them vibrant. And don't forget to wash your brushes well between colors—a little leftover paint can contaminate your next mixture in a heartbeat.
The best way around this is to fully embrace the layering process we've been talking about.
- Let each layer dry completely before you add the next. This simple act of patience prevents the colors from physically mushing together into a brown mess.
- Try working from dark to light. Slapping a light color over a wet dark one is a one-way ticket to Mudville.
- Consider a stay-wet palette. It keeps your paint workable for much longer, so you won't feel rushed and tempted to mix things on the canvas that you shouldn't.
Honestly, the cleanest colors come from patience. Letting one layer dry before starting the next is the single best thing you can do to avoid muddy results and create those rich, vibrant animal portraits you're after.
Can I Paint Over My Mistakes?
You absolutely can! This is one of the best things about working with acrylics. They are incredibly forgiving. Because the paint is opaque and dries fast, fixing a slip-up is usually a no-stress situation.
If you paint a section and you just don't like it, just walk away for a few minutes and let it dry. Once it's dry to the touch, you can simply paint right over the top of it. It’s like having a built-in "undo" button for your painting.
Got a bigger mistake with some lumpy texture you don't want? No problem. Once the paint is fully cured (give it a day to be safe), you can take some fine-grit sandpaper and gently sand the area smooth. A quick coat of gesso over that spot, and you've got a fresh, clean surface ready for a do-over.
What Makes a Good Reference Photo?
Choosing the right reference photo is more than half the battle—a great photo gives you all the information you need to create a painting with life and depth.
First, look for images with strong, clear lighting. Good light carves out the animal's shape with distinct highlights and shadows, which is exactly what you need to translate to make your painting look three-dimensional. I always tell people to avoid photos taken with a harsh, direct flash; they just flatten everything out and hide all the good details.
High resolution is also non-negotiable. You need to be able to zoom in and really see the tiny details, like which way the fur grows around the nose or the little catchlights in the eyes. A blurry photo forces you to guess, and guessing leads to frustration. Finally, look for a photo that shows some personality! A unique expression or a quirky pose is what will truly make your painting special.
At William Tucker Art, my goal is to capture the unique spirit of every animal. You can explore my collections of stunning wildlife and pet portraits to see how all these techniques come together in a finished piece.