
So, you want to paint animals with acrylics? You've come to the right place.
Acrylic paint is the go-to for capturing everything from the wild spirit of a wolf to the soulful gaze of a family dog. It's a wonderfully forgiving medium, loved by seasoned pros and absolute beginners alike for its versatility and brilliant color.
Your Journey into Acrylic Animal Painting Starts Here
Think of this as your personal roadmap into the world of animal art. We're going to break down everything you need to know, whether you're nervously staring at your first blank canvas or you're an experienced painter looking to refine your skills. The goal here is to make the whole process feel less intimidating and a lot more fun.
We’ll walk through why acrylics are such a fantastic choice for bringing animals to life on canvas. From creating the soft, believable texture of fur to the sharp, gleaming glint in an eye, these paints can do it all. Let's get you from that empty canvas to a finished piece you'll be genuinely proud of.
Why Start with Acrylics?
For painting animals, acrylics have some serious advantages. The biggest one? They dry fast. This means you can build up layers of color and texture quickly without having to wait around for days. It's a lifesaver when you're trying to render the complex details of an animal’s coat or the delicate patterns on a feather.
You can also change their consistency on the fly. Add a little water, and they behave like watercolors for soft washes. Use them straight from the tube, and you get thick, rich textures that feel almost like oil paint.
This flexibility is a huge reason why so many artists are drawn to them. In fact, the global art paint market, which acrylics are a big part of, is expected to jump from USD 2,903.56 million in 2025 to a whopping USD 4,992.44 million by 2034. If you're curious, you can explore more data on the expanding art paint industry and see how this trend is playing out.
The real beauty of acrylic animal painting is how accessible it is. You don't need a fancy studio or harsh chemical solvents to get started. A few basic supplies, a photo you love, and a bit of patience are all it takes to start creating art that celebrates the animal kingdom.
Here’s a sneak peek at what we'll cover to get you on your way:
- Choosing the Right Supplies: We'll cut through the noise and help you pick the best paints, brushes, and canvases without breaking the bank.
- Mastering Core Techniques: You'll get the hang of essential skills like layering, glazing, and building realistic textures.
- Completing Your First Portrait: We’ll guide you step-by-step, from the initial sketch to adding those final, perfect details.
2. Gearing Up: Your Essential Painting Toolkit
Walking into an art store can feel like stepping into a candy shop—so many options, it’s hard to know where to begin! But don't let it overwhelm you. Getting set up for acrylic animal painting is all about choosing the right tools for the job, and it’s actually a lot of fun. Think of it less like a shopping list and more like curating your own creative arsenal.
Student vs. Professional Paints: What's the Difference?
Your first big choice is the paint itself. You’ll see two main categories on the shelves: student grade and professional grade.
Student-grade paints are your best friend when you're starting out. They’re more budget-friendly because they have a bit less pure pigment and more binder. This makes them perfect for practicing, experimenting with techniques, and not worrying about "wasting" expensive paint while you're learning.
Professional-grade (or artist-grade) paints are where the magic really happens. They are loaded with high-quality, pure pigments, which means the colors are incredibly vibrant and cover the canvas beautifully. They’re also designed to last, with excellent lightfastness to ensure your acrylic animal painting won't fade. The difference in quality is something you can truly see and feel.
Building Your Core Color Palette
Here's a little secret: you don't need dozens of tubes of paint to create stunning art. In fact, starting with a limited palette is one of the best ways to master color mixing and ensure your paintings feel cohesive and natural. For painting animals, a few key colors will get you surprisingly far.
A great starter set includes:
- Titanium White: An absolute must-have. You'll use it constantly for mixing lighter tones and adding those final, bright highlights.
- Mars Black: Essential for creating deep, rich shadows. While some artists prefer mixing their own darks, having a true black on hand is incredibly useful.
- Burnt Umber & Raw Sienna: These are the workhorses of any animal painter's palette. They're perfect for creating realistic fur, earthy landscapes, and beautiful, muted tones.
- Cadmium Yellow Light: A clean, bright primary yellow.
- Cadmium Red Light: A warm, powerful primary red.
- Ultramarine Blue: A deep and versatile primary blue, great for skies and cool-toned shadows.
With just these six colors plus white and black, you can mix nearly any hue you'll need. It's the versatility and durability of acrylics that have made them a favorite. In fact, within the broader paints and coatings industry, acrylic resin is the dominant type, holding a massive 36.26% of the market share in 2024. Its fantastic color retention is a big reason why. You can read the full research on acrylics' market dominance for a deeper dive.
Brushes and Surfaces: Your Connection to the Canvas
Your brushes are a direct extension of your hand. Different shapes do different things, and having a small, versatile collection will set you up for success.
- Flat Brushes: These square-tipped brushes are perfect for covering large areas, like blocking in a background or the main body of an animal.
- Round Brushes: With their fine, pointed tips, round brushes are your go-to for details. Think eyes, whiskers, and delicate wisps of fur.
- Filbert Brushes: These are a fantastic hybrid—flat but with a rounded tip. They’re wonderful for blending and creating soft, organic shapes.
As for what to paint on, stretched canvas is the classic choice. It's ready to go right off the shelf and has a lovely woven texture (called "tooth") that grabs the paint. For super-detailed work, you might prefer a wood panel. Its smooth surface lets you create fine lines without any canvas texture getting in the way.
Artist's Tip: A few other items will make your life much easier. Grab a palette for mixing colors (a simple ceramic plate or a dedicated stay-wet palette works great), two water jars (one for rinsing, one for clean water), and a roll of paper towels. An easel is also a game-changer for your posture and perspective!
Let's break down the essentials into a quick-reference guide.
Essential Supplies for Your Acrylic Animal Painting Toolkit
This table helps you decide what you absolutely need to start versus what you can add as you grow more confident and want to explore more advanced techniques.
| Category | Essential (Must-Haves) | Recommended (For Better Results) | Optional (For Advanced Techniques) |
|---|---|---|---|
| Paints | A basic set of student-grade acrylics (the core palette mentioned above). | Professional-grade paints for key colors like white and earth tones. | Specialty paints like heavy-body, fluid, or metallic acrylics. |
| Brushes | A small variety pack with one flat, one round, and one filbert brush. | A wider range of brush sizes and a few higher-quality synthetic brushes. | Detail brushes, fan brushes for texture, and palette knives. |
| Surfaces | Small-to-medium stretched canvases or canvas boards. | A mix of canvas sizes and a smooth wood panel to try. | Gesso-primed panels, watercolor paper, or large-format canvases. |
| Palette | A simple ceramic plate, disposable palette paper, or plastic tray. | A stay-wet palette to keep your paints usable for longer sessions. | A large glass palette for easy cleaning and color mixing. |
| Setup | Two water jars, paper towels, and a flat surface to work on. | A tabletop or standing easel and a dedicated painting area. | Mediums (glazing, gloss, matte), varnish, and a spray bottle. |
Once you've got these core tools in place, you’ve cleared the path to focus on what truly matters: the pure joy of painting and bringing your favorite animals to life on the canvas.
Mastering Techniques for Realistic Animal Textures
This is where the magic really happens. We're moving beyond just shapes and colors and getting into the heart of what makes an animal portrait feel alive. It’s all about texture—convincing the viewer they can almost feel the velvety softness of a rabbit's fur, the cool smoothness of a snake's scales, or the delicate structure of a bird's feather.
There isn't one single "magic brushstroke" for this. Instead, it's about mastering a few foundational techniques that work together to build incredible realism from the ground up.
The Power of Layering for Depth and Form
Think of layering like building a house, brick by brick. You wouldn't start by putting up the curtains, right? You build the foundation and walls first. In painting, layering is that foundation. It’s the process of applying thin coats of paint, letting each one dry completely before adding the next.
Since acrylics dry so fast, you can build up a ton of history on the canvas in just one session. This is how we create real dimension.
Let's say you're painting a wolf. You wouldn't dive in trying to paint every single hair. That’s a recipe for a flat, busy-looking mess. Instead, you'd start by blocking in the big shapes of light and shadow with your mid-tones. The first few layers are all about establishing the animal's form—the powerful muscles under the fur, the turn of its head, the depth of its chest. Each layer that follows adds more specific information, like a darker wash for a deep shadow or a pop of light where the sun hits its back.
Layering is fundamentally about building history on the canvas. Every transparent or opaque layer you add contributes to the final richness and complexity of the image, preventing your painting from looking flat or one-dimensional.
This methodical approach keeps your colors clean and vibrant, preventing them from turning to mud. It's almost like you're sculpting with paint, slowly carving the animal's three-dimensional form out of a flat surface.
Adding Nuance with Glazing
Once your layers have built a solid form, it's time for glazing. This is where the subtlety and life really start to shine through. A glaze is just a super-thin, transparent layer of paint, made by mixing a tiny bit of color with a lot of acrylic medium or water. When you brush this over a dry area, it doesn't cover it up; it just tints it.
Imagine placing a piece of colored cellophane over a black-and-white photo. You still see the image underneath perfectly, but now it has a wash of color. That's a glaze! It's an incredible tool for making fine adjustments.
- Fine-Tuning Colors: Is that patch of fur looking a little too warm? A thin glaze of blue will cool it right down without you losing any of the detail you've already painted.
- Deepening Shadows: Instead of using flat black, a transparent glaze of a dark color (like a deep purple or brown) can enrich shadows, giving them a more natural and luminous feel.
- Creating Iridescence: This is the secret to painting things like raven feathers or fish scales. By layering thin glazes of different colors—say, blue, green, and purple—you can mimic that stunning, color-shifting shimmer.
Glazing is what gives a painting that professional, polished glow. It creates those beautiful, soft transitions that are nearly impossible to get with thick, opaque paint alone.
Capturing Lifelike Textures Brushstroke by Brushstroke
Okay, the foundation is solid. The color is nuanced. Now for the fun part: creating the specific textures that make the animal instantly recognizable. Every animal is different, and your brushwork needs to adapt.
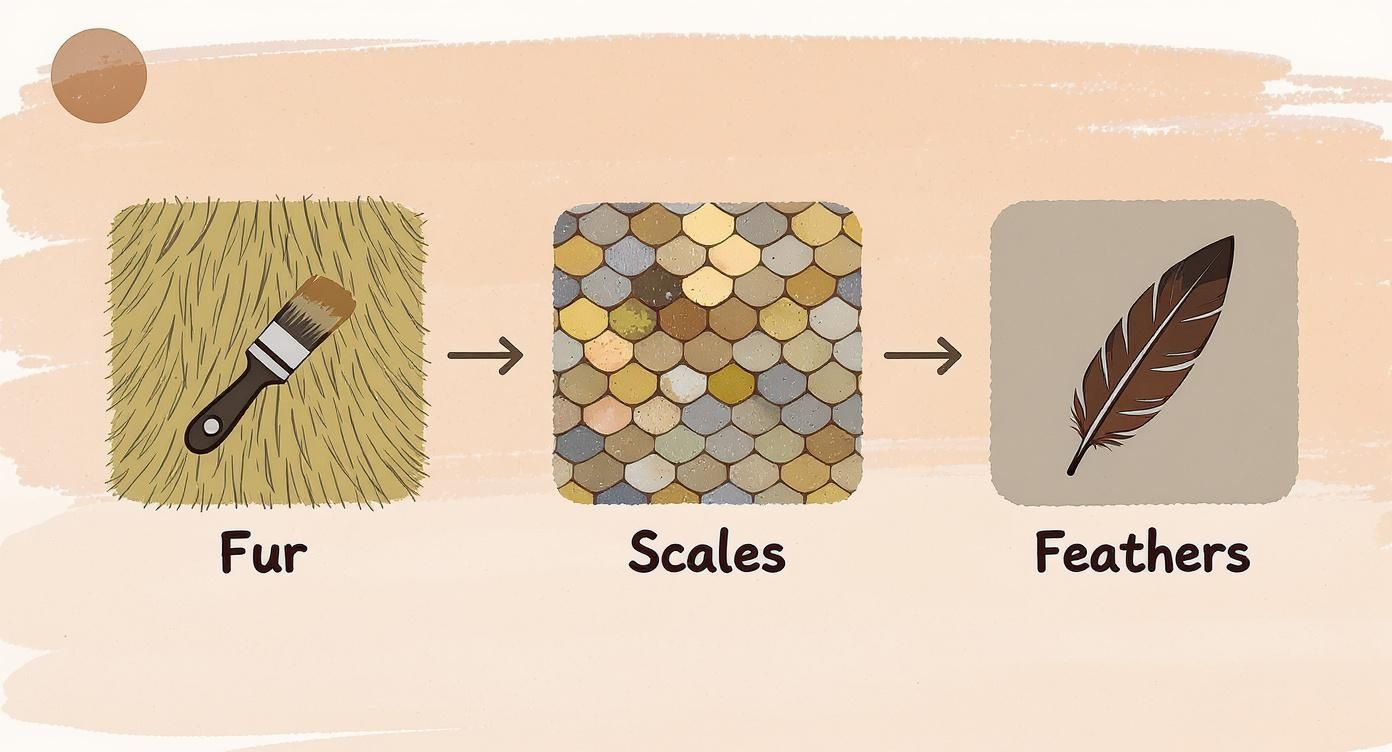
Here's a quick look at how to tackle the big three:
-
Painting Soft Fur: The secret to believable fur is to suggest, not to render. Please, don't try to paint every single hair! Use a fine-tipped brush or even a fan brush to gently flick on thin lines of color, always making sure your strokes follow the natural direction of the fur's growth. Layering is everything here: start with darker, shorter strokes as your base, then build up with lighter, longer strokes for the highlights on top.
-
Rendering Rough Scales: For reptiles and fish, it's all about playing with light and shadow on a pattern. I like to use a small, flat brush to map out the basic shape of the scales. The trick that makes them pop is to add a tiny highlight to the top edge of each scale and a small shadow along the bottom edge. This simple formula instantly creates a 3D effect that looks fantastic.
-
Creating Delicate Feathers: Feathers are a beautiful mix of soft texture and rigid structure. Start by smoothly blending your base colors with a soft filbert brush. Then, switch to a very fine liner brush to carefully paint in the central shaft (the rachis) and the tiny, delicate barbs. For those super soft, downy feathers, try a dry brushing technique—get a tiny bit of paint on an almost-dry brush and gently scumble it on to create a hazy, soft-focus texture.
By weaving together these techniques—layering for form, glazing for color, and specific brushwork for detail—you can bring any animal to life on your canvas with stunning realism.
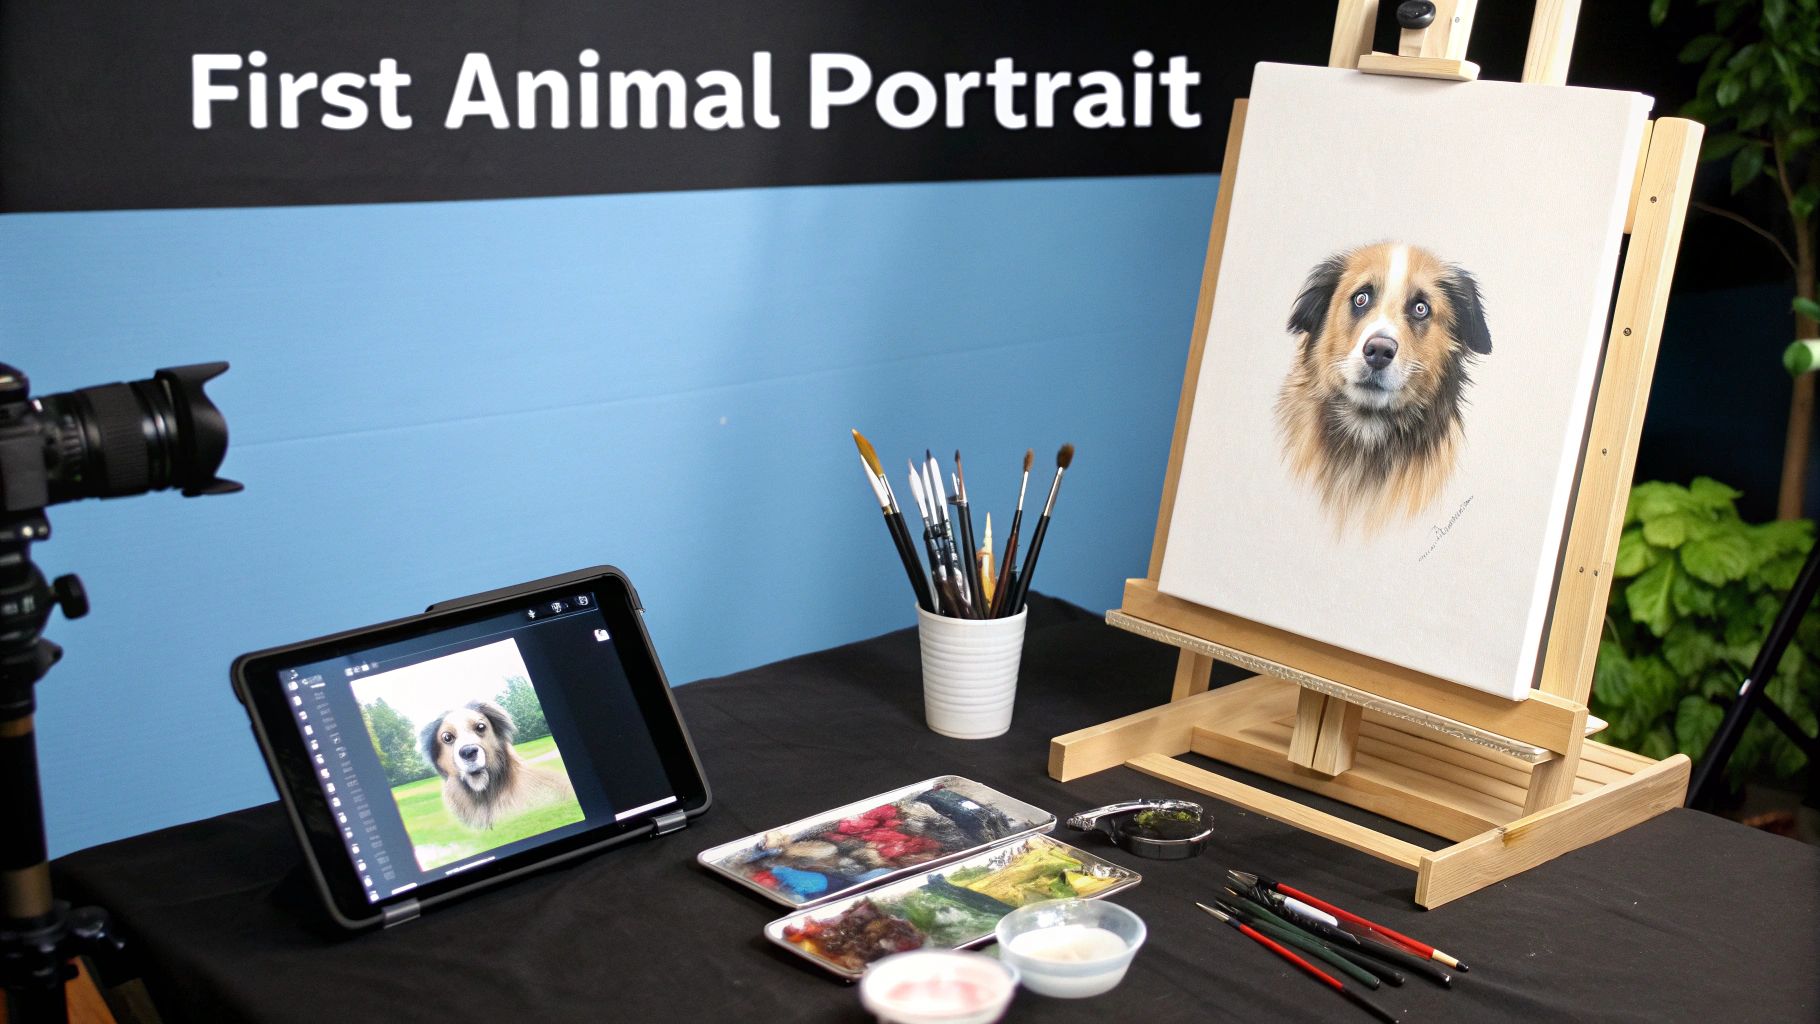
Painting Your First Animal Portrait Step by Step
Alright, let's pull together everything we've talked about and walk through a real project. This is where the rubber meets the road! I'll guide you through the whole process of creating an acrylic animal painting, from that crucial first decision—choosing your subject—all the way to adding those finishing touches that make a portrait feel alive.
Think of this as a roadmap, not a rigid set of rules. As you get more comfortable, you’ll naturally start to adapt these steps to fit your own unique style.
Step 1: Choose Your Reference Photo
I can't stress this enough: the success of your painting is almost entirely dependent on the quality of your reference photo. A great photo is your blueprint. It gives you all the information you need about light, form, and texture. Trying to work from a blurry, poorly lit photo is a recipe for frustration.
Look for a photo that has:
- Clear Lighting: You want strong, directional light. This creates those beautiful highlights and deep shadows that make an animal look three-dimensional on the canvas.
- High Resolution: You need to be able to zoom in and really see the details, especially around the eyes and in the fur, without it all turning into a pixelated mess.
- An Engaging Pose: Find an image that really shows off the animal's personality. Sometimes a simple head-and-shoulders shot where they're looking right at you can be incredibly powerful.
Choosing the right image is a skill in itself. If you want a deeper dive, our guide on finding and using animal reference photos for artists is a fantastic place to start.
Step 2: Sketch Your Composition
Got your photo? Great. Now it’s time to get the basic shapes onto your canvas. Don't get lost in the weeds here—we're not drawing every single hair. The goal is simply to map out the composition and make sure the proportions are right.
I like to use a light graphite pencil or some thinned-down, neutral paint (like a light grey) for this. Just focus on the big shapes: the outline of the head, where the eyes and nose go, and the general flow of the body. This is your foundation.
Step 3: Apply the Underpainting
This next step, the underpainting (or "blocking in"), is my secret weapon for creating realistic paintings. It’s a thin, single-color layer of paint that establishes your lights and darks right from the get-go. By getting rid of that stark white canvas, you can judge your colors and values much more accurately as you move forward.
Using one color—Burnt Umber is a classic, or you can mix black and white for a simple grey—thinly paint in your darkest shadows and mid-tones. Leave the brightest highlight areas as bare canvas. This simple value map will guide every layer of color you add on top.
Think of the underpainting as creating a black-and-white version of your final piece. It solves all the tricky problems of light and shadow before you even have to think about color. Trust me, it makes the rest of the process so much smoother.
Step 4: Build Your Layers of Color
Now for the fun part—bringing in the color! The beauty of acrylics is how fast they dry, which is perfect for building up thin, rich layers.
Start by applying your mid-tone colors over the corresponding areas of your underpainting. If you're painting a brown dog, for example, you’d lay down a base coat of medium brown over all the fur. Work from big shapes to small details.
Let each layer dry before adding the next. This is where you can start to introduce subtle shifts in color. A dog's coat is never just one flat brown, right? You'll find warmer, reddish tones where the light hits and cooler, darker tones in the shadows. Applying these in thin, almost transparent layers will gradually build a beautiful complexity.
Step 5: Focus on the Eyes
The eyes are everything. They are the soul of the portrait, where the animal’s spirit truly shines through. You have to get them right.
- Start with a Dark Base: Fill the entire eye socket with a dark color, like black or a deep brown.
- Add the Iris Color: Layer the main iris color over that dark base, but leave a thin dark ring around the outside edge.
- Create Depth: Dab in some lighter flecks and subtle color variations to give the iris dimension.
- Place the Catchlight: This is the magic touch. Add one small, sharp dot of pure white paint to show the reflection of light. The placement of this tiny dot determines the animal's gaze and instantly makes the eye look wet and alive.
Step 6: Render Fur and Final Details
With your base colors down and the eyes sparkling, it's time to render the texture of the fur. Grab a fine-tipped brush and start laying in individual strokes that follow the direction the fur grows.
I always start with darker colors to define the clumps of fur in the shadows. Then, I gradually work my way up to lighter colors, saving the brightest highlights for last. This layering of fine strokes creates that wonderful illusion of soft, touchable fur.
Finally, step back and add those last little details—the whiskers, a wet highlight on the nose, and any sharp, final shadows. And there you have it: your very own acrylic animal painting.
How to Commission a Custom Animal Painting
There’s something truly special about commissioning a custom acrylic painting of an animal you love. It’s more than just buying art; it’s a collaborative journey with an artist to create something deeply personal and one-of-a-kind. But if you're new to the process, it can feel a little intimidating.
Think of it like having a bespoke piece of furniture made. You’d want to see the artisan’s past work and talk through the design, right? The same goes for art. Your first move is to find an artist whose style truly speaks to you.
This kind of personal collaboration is a big part of why unique, handcrafted art is so popular. The market for non-commercial acrylic paint—the kind artists use for fine art and custom portraits—was valued at a staggering USD 8.74 billion in 2024 and is expected to hit USD 11.32 billion by 2035. It shows just how much people value art made with a human touch.
Finding Your Perfect Artist
Your quest starts with a bit of fun research. Dive into artists' portfolios online, scroll through their work on social media, or visit local galleries. You're looking for an artist whose work resonates with your vision.
Pay attention to consistency. Do they have a solid track record of painting the type of animal you have in mind? Does their artistic voice—the way they play with color, light, and emotion—feel like the right fit for your story? An artist's portfolio is their visual resume, and for them, maintaining a consistent brand voice across multiple channels is key to connecting with clients like you.
Once you’ve found a few artists who catch your eye, it’s time to start a conversation.
Key Questions to Ask Before You Commit
Reaching out is about more than just getting a price. This is your chance to get a feel for the artist's process and make sure you click. A good, open chat right from the beginning is the secret to avoiding any surprises and ending up with a painting you absolutely adore.
Before you send that first email, jot down a few questions. Here are the essentials you’ll want to cover:
- Process and Timeline: "Can you walk me through how you typically handle a commission? What’s a realistic timeline from when we start to when the painting is finished?"
- Pricing Structure: "How do you figure out your pricing? Does it change based on the painting's size, how complex it is, or if there's more than one animal?"
- Revisions and Feedback: "Will I get to see the painting in progress? And how many chances for feedback are included in the price?"
- Reference Photos: "What makes a great reference photo for you? What kind of pictures do you need from me to really capture their personality?"
- Payment and Contract: "What are your payment terms? Is there a deposit, and do we sign a contract to make everything official?"
The best commissions are built on clear communication and mutual trust. Never hesitate to ask questions. A professional artist will be happy to explain their process and make sure you feel excited and confident every step of the way.
Protecting and Displaying Your Finished Artwork
You’ve done it. You’ve put in the hours, mixed the perfect colors, and brought an animal to life on your canvas. Finishing a painting is an incredible feeling, but there's one last, vital step to make sure your work stands the test of time: protection.
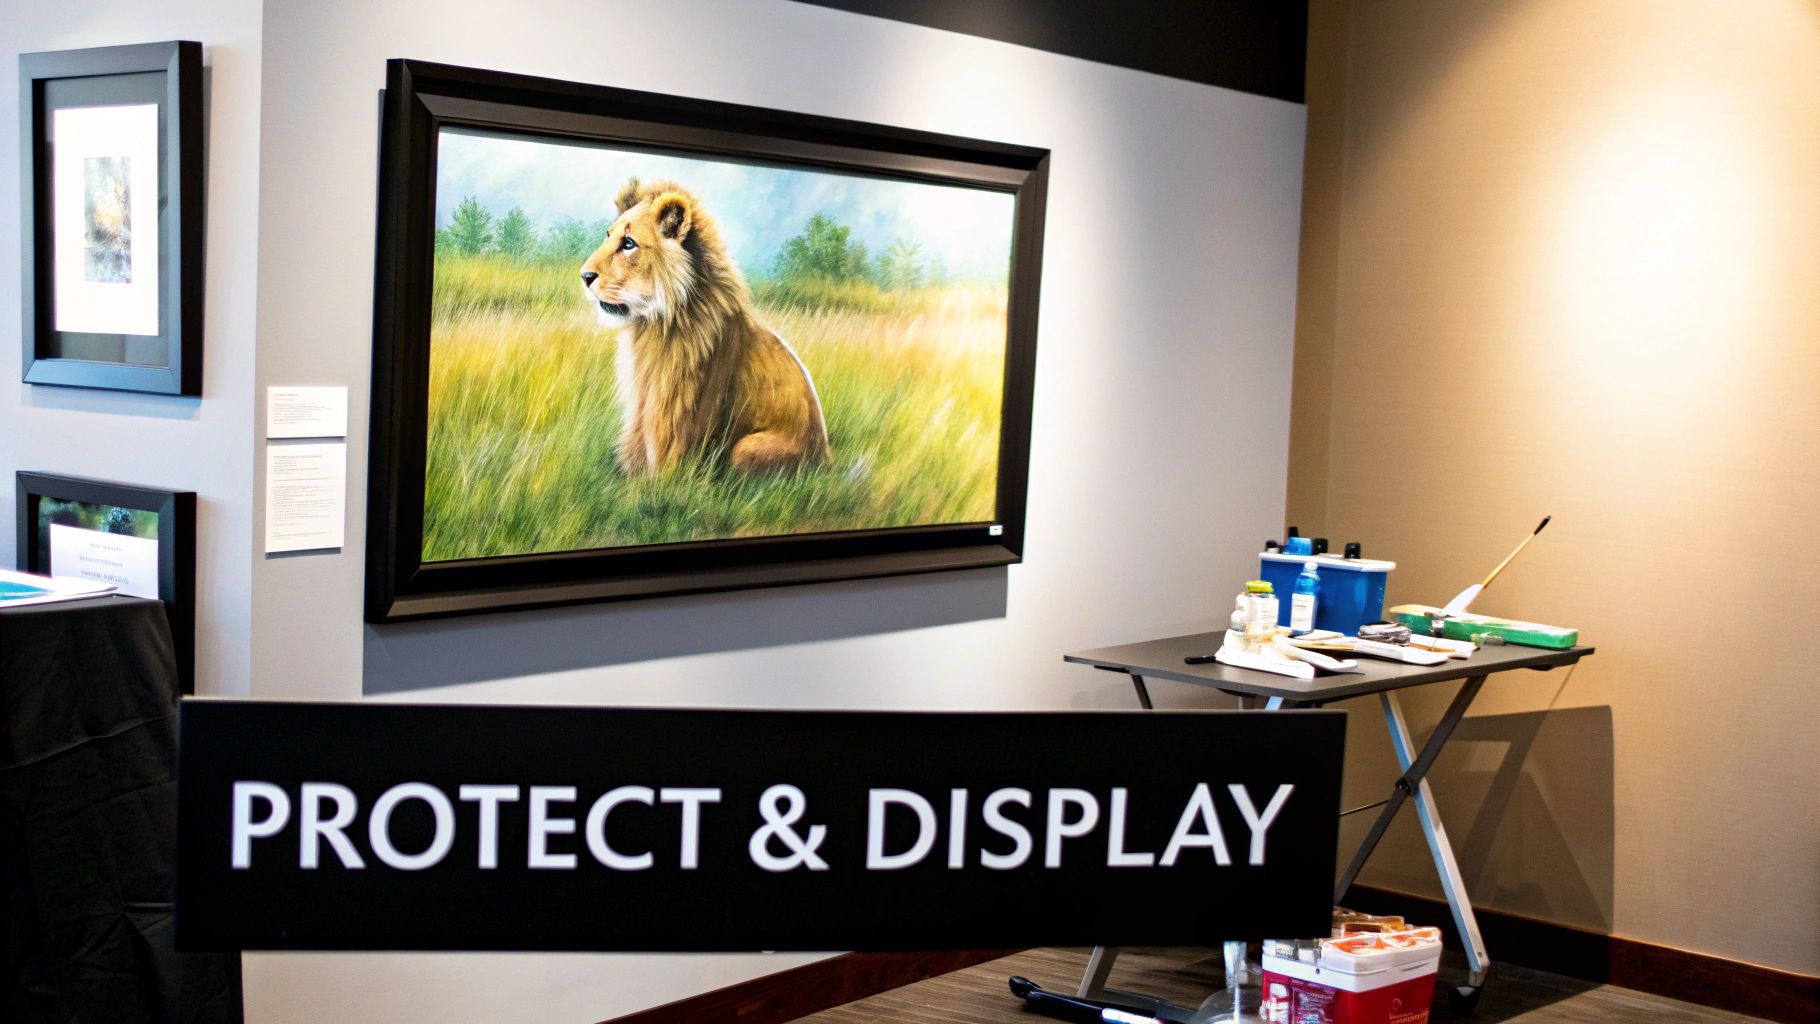
Think of varnish as the ultimate bodyguard for your art. It’s a clear, final coat that acts as a removable shield against all the things that want to dull your masterpiece—dust, grime, and especially the fading effects of UV light.
Choosing the Right Varnish
Varnish does more than just protect; it unifies the entire look of your painting. You might notice that some acrylic colors dry with a bit of a sheen while others look more matte. Varnish evens all that out for a truly professional finish.
You’ve got three main choices here:
- Gloss Varnish: This gives you a shiny, almost wet look that makes colors pop with incredible depth and saturation.
- Matte Varnish: For a more contemporary, understated vibe, a matte finish eliminates reflections and gives a soft, flat appearance.
- Satin Varnish: The happy medium. It offers a gentle luster that’s not too shiny and not too flat, making it a go-to for many artists.
My best advice? Apply your varnish in a clean, dust-free space using a soft, wide brush. Always go for two thin, even coats instead of one thick one to avoid drips and uneven patches. For a deeper dive, check out our guide on https://williamtuckerart.com/blogs/interesting-articles/how-to-preserve-acrylic-paintings.
Here’s the real magic of a good varnish: it's removable. Years from now, if that top layer gets dirty, a conservator can gently remove it and apply a fresh coat. The original paint beneath remains untouched, restoring your work to its former glory.
Framing and Displaying Your Piece
The right frame can completely transform your painting, turning it from a simple canvas into a stunning centerpiece. The key is to find a frame that complements your art without stealing the show. Clean, simple frames are fantastic for a modern feel, while a more traditional piece might call for something a bit more ornate.
Think carefully about where you’ll hang your new painting. Direct sunlight is the enemy, even with a UV-protective varnish. It will inevitably cause colors to fade over the long term. Instead, opt for a spot with soft, indirect natural light or install a dedicated picture light to really make your acrylic animal painting shine.
And if you’re thinking about making prints of your work, getting the digital file right is everything. To ensure your reproductions are sharp and do justice to the original, it’s worth taking the time to learn about essential print resolution standards like 300 DPI. High-quality prints honor both your effort and your art.
Your Acrylic Painting Questions Answered
As you get your hands dirty and start slinging some paint, you're bound to run into a few questions. This is totally normal! Think of this section as your go-to guide for a few of the most common snags artists hit when tackling an acrylic animal painting.
Let's clear up three frequent questions that pop up for painters at every skill level. Getting these sorted will help you paint with way more confidence and a lot less frustration.
How Do I Keep My Acrylic Paints from Drying Too Fast?
Ah, the classic acrylics dilemma! Their fast-drying time is a blessing when you want to layer colors quickly, but it can feel like a curse when you’re trying to get a soft, seamless blend.
Luckily, you have a few tricks up your sleeve. A stay-wet palette is an absolute game-changer. It's a special tray with a sponge and membrane paper that keeps your paints workable for hours, sometimes even days. You can also mix a bit of "retarder" medium into your paint, which does exactly what it sounds like—it slows down the drying time.
The simplest fix? Keep a small spray bottle of water nearby. A light spritz on your palette and canvas every so often is often all you need.
What Is the Best Way to Paint Realistic Eyes?
The eyes are everything in an animal portrait. Get them right, and your subject comes alive; get them wrong, and the whole piece can feel flat. The secret is all about building layers and understanding where the light is coming from.
Start by blocking in the pupil and iris with a dark base color to create depth. Then, begin layering your iris colors over top, but always leave a thin dark ring around the very edge—this helps define the eye's shape. The real magic, though, is the catchlight.
That tiny dot of bright white paint—the reflection of a light source—is what breathes life into the eye. It adds moisture, emotion, and realism, making the animal feel truly present.
Can I Paint Over an Old Painting?
You sure can! This is one of the best things about working with acrylics. Their opacity makes them perfect for giving an old canvas a second chance. If you have a painting that just didn't work out, don't toss it.
First, give the surface a light sanding to knock down any thick texture from the old paint. Wipe off the dust, and then apply a coat or two of gesso. This primer gives you a fresh, white, and perfectly absorbent surface that’s good as new. It’s a great way to save money and practice without fear, and it’s a much more sustainable way to make art.
At William Tucker Art, we believe art is a powerful way to connect with the wild spirit of nature. Take a look through our collections of wildlife and pet portraits to find a piece that truly resonates.