
Welcome to the thrilling world of wildlife photography! It's a journey that combines a deep passion for nature with the art of capturing fleeting, powerful moments. Whether you're dreaming of photographing a lion on the savanna or simply capturing the unique character of a squirrel in your local park, the right techniques can elevate a good shot into a breathtaking masterpiece.
This guide moves beyond the basics, offering a collection of actionable, pro-level wild animal photography tips designed to help you anticipate animal behavior, master your camera gear, and tell compelling stories through your images. We'll explore everything from choosing the right lens and perfecting your fieldcraft to understanding the crucial ethical responsibilities that come with this rewarding pursuit.
Great wildlife photography is about creating a connection and telling a story that honors the natural world. Instead of just documenting an animal's presence, these tips will help you create stunning portraits that resonate deeply with viewers. Let's dive in and start your path toward capturing those unforgettable moments in the wild.
1. Use Long Focal Length Lenses
When it comes to wild animal photography tips that truly make a difference, starting with the right lens is paramount. Long focal length lenses, often called telephoto or super-telephoto lenses, are your secret weapon for capturing stunning, intimate portraits of wildlife without disturbing them. Think of lenses in the 300mm to 800mm range (or even longer) as your ticket to getting close while maintaining a safe and respectful distance.
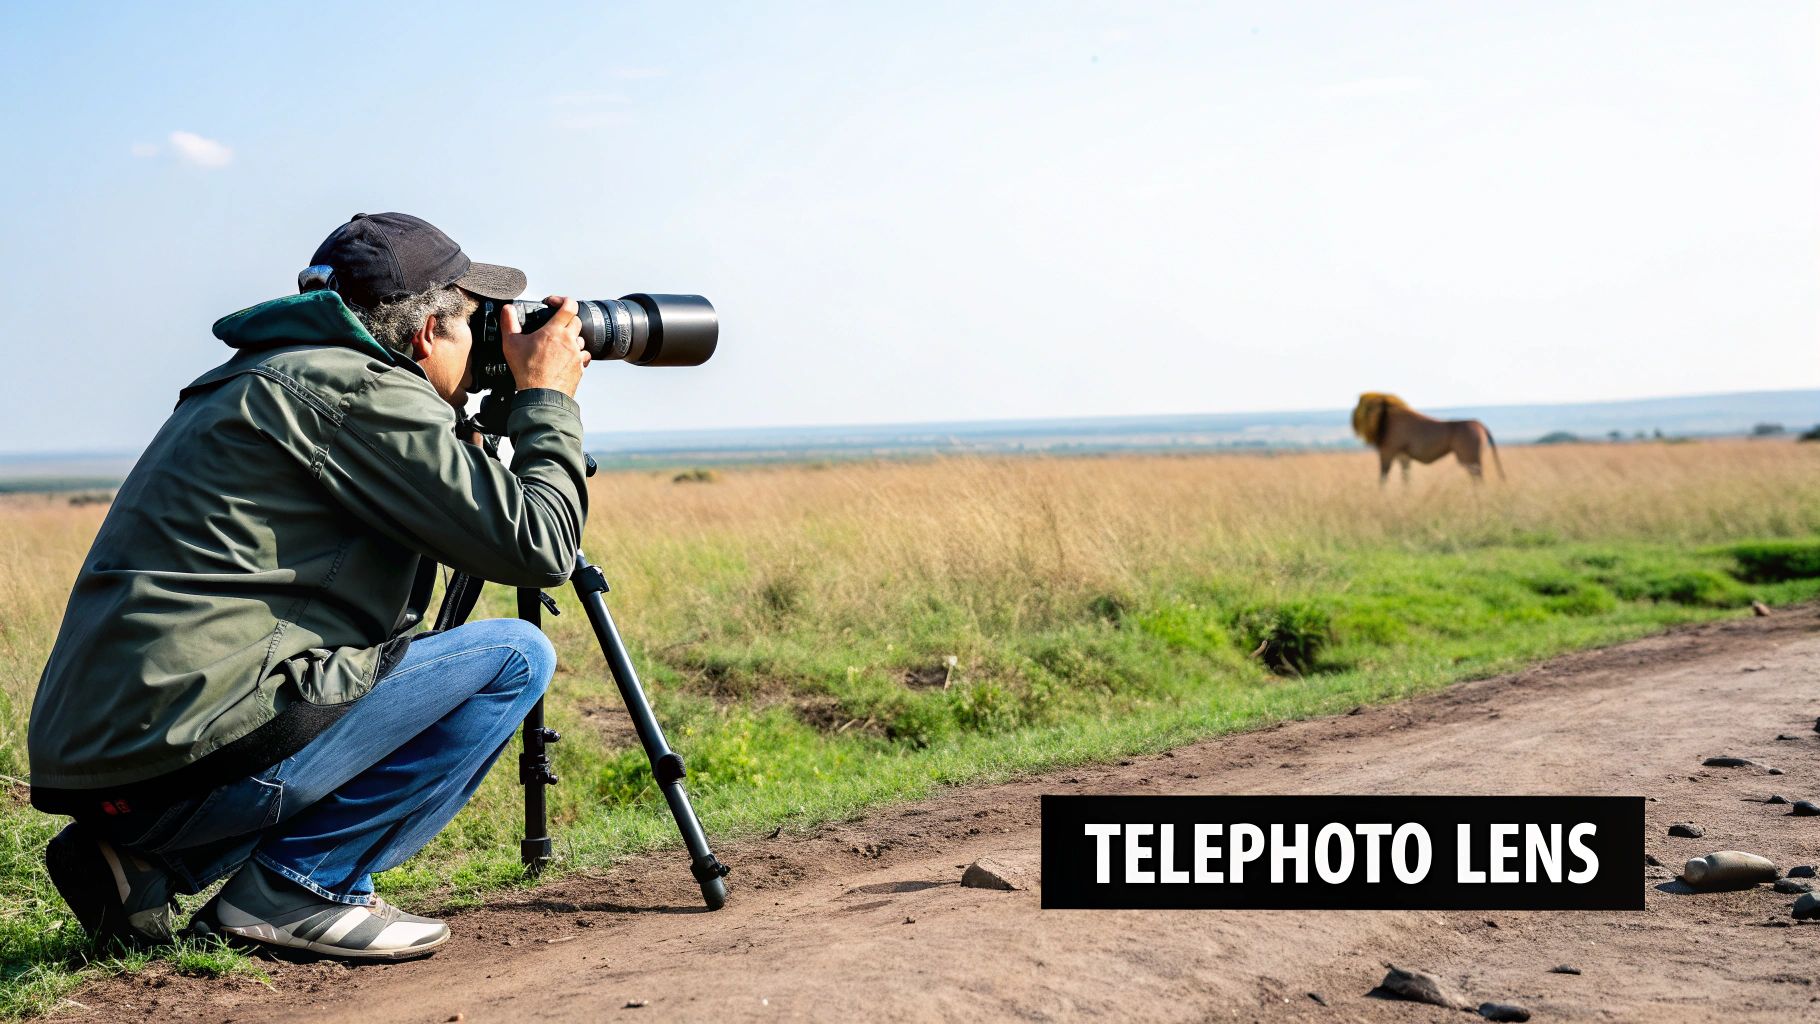
These specialized lenses magnify distant subjects, allowing you to fill the frame with an animal that might be hundreds of feet away. This is crucial not only for safety (yours and the animal's) but also for capturing natural behavior. Animals that are unaware of your presence are more likely to act naturally, giving you a glimpse into their world.
Why Go Long? The Key Benefits
A long lens does more than just get you "closer." It fundamentally changes the look of your image. One of the most sought-after effects is background compression. This phenomenon makes the background appear closer to your subject, which helps to isolate the animal and create a beautifully blurred, non-distracting backdrop.
Pro Tip: Lenses like the iconic Canon EF 600mm f/4L series or the Sony FE 600mm f/4 GM OSS are industry standards for a reason. They offer incredible reach and sharpness, allowing photographers to capture magazine-quality images from afar.
Actionable Tips for Using Long Lenses
Mastering a long lens takes practice. Here are a few essential tips to get you started:
- Stabilize Your Gear: These lenses are heavy. A sturdy tripod or a more mobile monopod is non-negotiable for achieving sharp images, especially in low light.
- Practice Panning: Wildlife is rarely still. Practice panning, which involves moving your camera along with a moving subject, to create sharp shots of animals in motion with a blurred background.
- Extend Your Reach: If a 600mm lens is out of budget, a teleconverter (like a 1.4x or 2x) is a great accessory. It multiplies your focal length, turning a 300mm lens into a 420mm or 600mm lens, respectively.
2. Master Animal Behavior and Patterns
Beyond the technical gear, one of the most powerful wild animal photography tips is to become a student of your subject. Mastering animal behavior and understanding daily patterns, feeding habits, and migration routes is what separates a lucky snapshot from a truly breathtaking photograph. This deep knowledge allows you to anticipate action, position yourself in the right place at the right time, and capture authentic moments.
Knowing your subject's world means you can predict where a bird of prey will land or when a herd of elephants will visit the watering hole. Instead of reacting to what's happening, you're prepared for it. This proactive approach not only results in better images but also ensures you are respecting the animal's space and capturing natural, unstressed behaviors.
Why Study Behavior? The Key Benefits
Understanding your subject goes far beyond simply finding them. It allows you to capture the "story" of their lives. A key benefit is anticipating peak action. Knowing that a particular species is most active at dawn or that a certain call precedes a territorial dispute gives you a massive advantage, letting you set up your camera and settings before the critical moment happens.
Pro Tip: Legendary photographers like Frans Lanting spend immense time studying their subjects. His iconic work with penguin colonies was the result of understanding their seasonal and daily rhythms, allowing him to be in the perfect position to capture unique social interactions and environmental portraits.
Actionable Tips for Studying Wildlife
You don't need a biology degree to start learning. Here are a few practical tips to help you master animal behavior:
- Do Your Homework: Before any trip, dive into field guides, documentaries, and online research about your target species. Learn their diet, social structure, and signs of stress.
- Hire Local Expertise: A local guide or biologist is an invaluable resource. They have firsthand knowledge of the animals' territories and daily routines that you won't find in a book.
- Observe Patiently: Spend time just watching from a distance without your camera. Notice how the animals interact with each other and their environment. This patience will pay off with more intimate and meaningful photos.
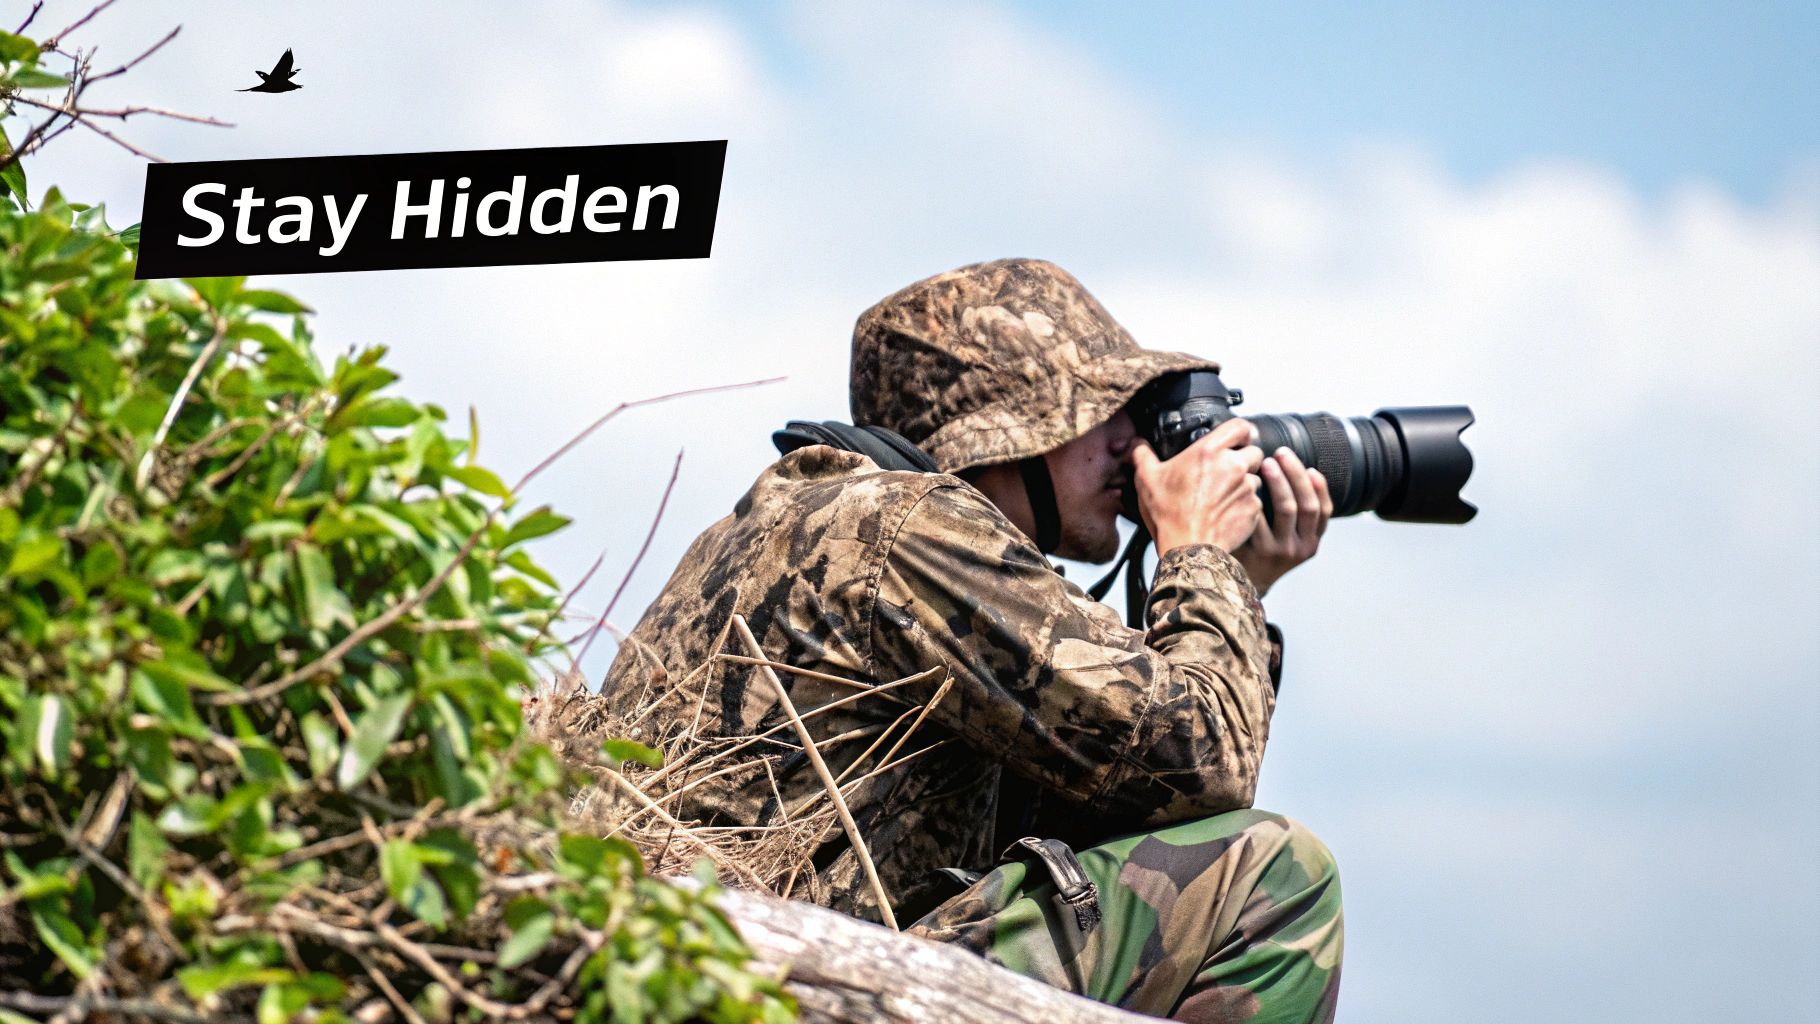
3. Perfect Your Fieldcraft and Camouflage Techniques
Among the most crucial wild animal photography tips is mastering the art of invisibility. Exceptional fieldcraft and camouflage are what separate a fleeting glimpse from a frame-worthy encounter. These skills involve more than just wearing a camo jacket; they are about understanding animal behavior, moving silently, using natural cover, and managing your scent to become part of the landscape.
This approach allows you to get significantly closer to your subjects without causing alarm. When animals are undisturbed, they exhibit their natural behaviors, from foraging and playing to caring for their young. The result is authentic, intimate imagery that tells a much deeper story than a simple portrait of a startled creature.
Why Blend In? The Key Benefits
Effective fieldcraft is your passport into an animal's personal space. By becoming a non-threatening presence, you unlock opportunities for unique compositions and behavioral shots. The primary advantage is reducing an animal's flight distance, which is the minimum space it needs to feel safe. When you are well-hidden and downwind, animals are more likely to approach you or ignore you completely.
Pro Tip: Photographers like Andy Rouse are masters of this, using low-profile portable blinds to capture incredible ground-level photos of big cats. Similarly, many top bird photographers rely on ghillie suits to disappear into forests and marshes, allowing them to photograph skittish species up close.
Actionable Tips for Fieldcraft and Camouflage
Becoming a ghost in the wild requires patience and practice. Here are a few essential tips to improve your fieldcraft:
- Mind the Wind: Always stay downwind of your subject. Most animals have an extraordinary sense of smell that serves as their primary danger alert.
- Move Slow, Freeze Often: Use slow, deliberate movements. If an animal looks up or seems alert, freeze completely until it resumes its normal activity.
- Use Blinds and Hides: A portable photography blind or a ghillie suit is an excellent investment. For permanent locations, consider setting up a hide days or weeks in advance to allow local wildlife to acclimate to its presence.
- Get Low: Practice low crawling and belly photography. A lower profile makes you seem less threatening and provides a more engaging, eye-level perspective for your photos.
4. Optimize Camera Settings for Wildlife Action
Your gear is only half the equation; knowing how to configure it for split-second moments is one of the most critical wild animal photography tips. Wildlife is unpredictable and often fast-moving, so your camera must be ready to capture sharp, clear images of fleeting action. This means dialing in specific settings like fast shutter speeds, continuous autofocus, and high-speed burst modes before you even spot your subject.
Think of it like a sports photographer preparing for a big game. You wouldn't use the same settings for a still portrait as you would for a sprinting athlete. Similarly, capturing a bird in flight requires a completely different approach than photographing a sleeping lion. Mastering these technical settings ensures you walk away with the shot instead of a blurry memory.
Why Your Settings Matter: The Key Benefits
Optimizing your camera settings is all about freezing motion and ensuring focus lands exactly where you want it. A fast shutter speed (often 1/1000s or faster) is non-negotiable for eliminating motion blur in active animals. Paired with a continuous autofocus (AF-C or AI Servo) mode, your camera will actively track the moving subject, keeping it sharp as it moves across the frame.
Pro Tip: Modern mirrorless cameras, like those from Sony, have revolutionized wildlife photography with their real-time Animal Eye AF. This technology automatically detects and locks focus onto an animal's eye, which is a game-changer for achieving tack-sharp portraits even when the subject is moving erratically.
Actionable Tips for Setting Up Your Camera
Get your camera action-ready with these essential configurations:
- Prioritize Shutter Speed: Use Shutter Priority (Tv or S) or Manual mode to set your shutter speed to at least 1/1000s for general action and 1/2000s or faster for birds in flight.
- Embrace Burst Mode: Set your camera to its highest continuous shooting (burst) mode. This allows you to capture a sequence of images, increasing your chances of getting the perfect pose or wing position.
- Master Back-Button Focus: Assign the autofocus function to a button on the back of your camera instead of the shutter button. This decouples focusing from taking a picture, allowing you to track a subject continuously without accidentally firing a shot.
- Use High-Speed Cards: Fast burst rates generate a lot of data. Use a high-speed memory card (UHS-II SD or CFexpress) to ensure your camera's buffer doesn't fill up and stop you from shooting at a critical moment.
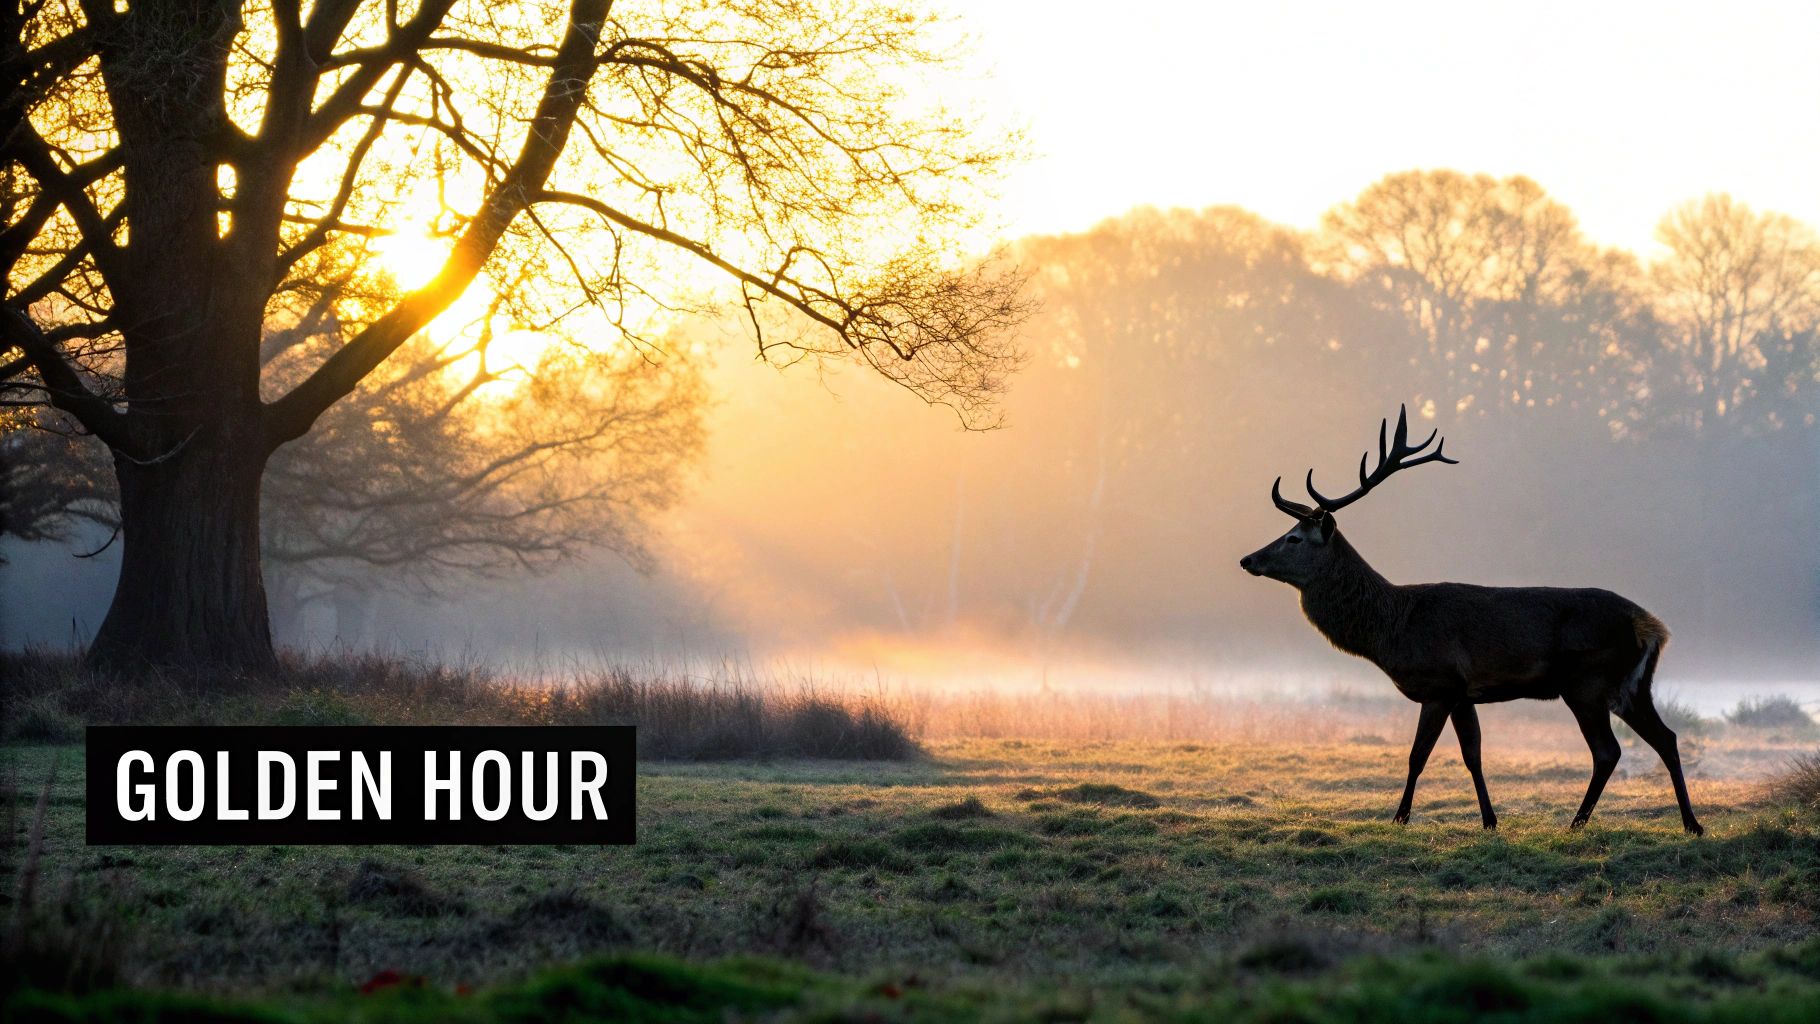
5. Master Lighting and Golden Hour Photography
If there’s one element that separates good wildlife photos from breathtaking ones, it’s light. Mastering lighting is one of the most impactful wild animal photography tips you can learn, and the "golden hours" just after sunrise and before sunset are your prime time. This magical light is warm, soft, and directional, creating a mood and depth that harsh midday sun simply cannot match.
During these times, the low angle of the sun sculpts your subject, revealing textures in fur and feathers while casting long, beautiful shadows. This dramatic light can transform an ordinary scene into an extraordinary photograph, adding a warm glow and an emotional quality that resonates with viewers. It’s also when many animals are most active, giving you the perfect combination of great light and interesting behavior.
Why Golden Hour is Gold: Key Benefits
Beyond a warm glow, golden hour light offers distinct advantages. Using backlighting (when the sun is behind the animal) can create a stunning rim light effect, outlining your subject in gold and separating it from the background. Side lighting is perfect for emphasizing texture and form, creating dramatic portraits with deep shadows and bright highlights.
Pro Tip: Look at the work of photographers like Suzi Eszterhas, who masterfully uses soft, backlit golden hour light to create intimate portraits of newborn animals. This technique adds a delicate, ethereal quality to the image while highlighting the animal’s form.
Actionable Tips for Mastering Light
Harnessing natural light requires planning and quick thinking. Here are a few essential tips to get you started:
- Scout Ahead: Visit your location during midday to plan your shots. Identify where the sun will rise and set so you can position yourself for the best possible light during the golden hours.
- Expose for Highlights: In tricky lighting, it's often better to underexpose slightly to preserve detail in the brightest parts of the image. You can lift the shadows in post-processing, but blown-out highlights are usually lost forever.
- Embrace Overcast Days: Don't put your camera away when it's cloudy. An overcast sky acts like a giant softbox, providing even, diffused light that is perfect for capturing detailed portraits without harsh shadows.
6. Employ Ethical Wildlife Photography Practices
Beyond the technical skills and gear, one of the most vital wild animal photography tips is to operate with a strong ethical framework. Ethical wildlife photography means prioritizing the animal's welfare above all else, ensuring that your presence does not cause stress, alter behavior, or disrupt their natural habitat. It's the "leave no trace" principle applied to photography, where the ultimate goal is to capture a beautiful image without compromising the safety and well-being of the subject.
This approach is championed by leading organizations like the North American Nature Photography Association (NANPA) and the International League of Conservation Photographers. Their guidelines are adopted by major publications and national parks, such as Yellowstone's strict regulations on wildlife viewing distances, underscoring the importance of a responsible and respectful practice.
Why Ethics Comes First: The Core Principles
An ethical approach ensures the long-term sustainability of wildlife photography. When animals are not stressed or harassed, they continue to live naturally in their habitats, allowing future generations of photographers and enthusiasts to enjoy them. This respect is fundamental to conservation and helps portray wildlife in an authentic, dignified manner.
Pro Tip: Before heading out, familiarize yourself with the specific behaviors of the animals you hope to photograph. Understanding their signs of stress (like a deer flicking its tail nervously or a bird giving an alarm call) is key to knowing when you are too close.
Actionable Tips for Ethical Photography
Putting ethics into practice is straightforward. Here are some essential guidelines to follow in the field:
- Respect the Distance: If an animal changes its behavior because of you, you are too close. Back away slowly and quietly. This is where long lenses, as mentioned earlier, become an ethical tool.
- Never Bait or Feed: Using food to lure an animal for a better shot is dangerous and unethical. It habituates them to humans and can lead to negative consequences for both the animal and people.
- Share Locations Responsibly: Avoid geotagging specific locations of sensitive or vulnerable species on social media. This can lead to overcrowding and disturbance.
- Learn the Local Rules: Parks and reserves have specific regulations for a reason. Always learn and follow them, as they are designed to protect local wildlife. For those looking to get more involved, there are many wildlife conservation volunteer opportunities that can deepen your understanding and appreciation.
7. Focus Techniques and Eye Sharpness Priority
Of all the wild animal photography tips you'll learn, this one is non-negotiable: the eyes must be sharp. The eyes are the window to an animal's soul, creating an emotional connection that transforms a simple snapshot into a powerful portrait. Modern camera technology offers sophisticated tools to ensure the most critical part of your subject is tack-sharp, making eye contact the focal point of your image.
Whether you're using single-point autofocus to manually select the eye or leveraging advanced Animal Eye AF, the goal is the same. You want to draw the viewer directly to the animal's gaze. This technique is what allows photographers like Steve Winter to capture such compelling images of big cats, where the intensity of their stare tells a story.
Why Prioritize the Eyes? The Key Benefits
Focusing on the eyes does more than just ensure a technically sharp photo; it creates a connection. When a viewer can look directly into a tack-sharp eye, they feel a sense of engagement and intimacy with the subject. This technique builds a narrative and evokes emotion, making the image far more memorable. It's the difference between documenting an animal and capturing its character.
Pro Tip: Modern mirrorless cameras from brands like Sony and Canon have revolutionized wildlife photography with their real-time Animal Eye AF. This technology automatically detects and locks focus onto an animal's eye, tracking it with incredible accuracy even as the animal moves.
Actionable Tips for Nailing Eye Focus
Mastering focus is a skill that separates good photographers from great ones. Here are a few essential tips to get you started:
- Focus on the Nearest Eye: When photographing an animal at an angle, always place your focus point on the eye closest to the camera. This creates a natural and pleasing look for the viewer.
- Use Back-Button Focus: Separate the act of focusing from releasing the shutter. Assigning focus to a button on the back of your camera allows you to lock focus and recompose without the camera trying to refocus every time you press the shutter.
- Know Your AF Modes: Spend time learning your camera's autofocus settings. Practice with Continuous AF (AF-C or AI Servo) for moving subjects and understand how different AF area modes work best for various scenarios.
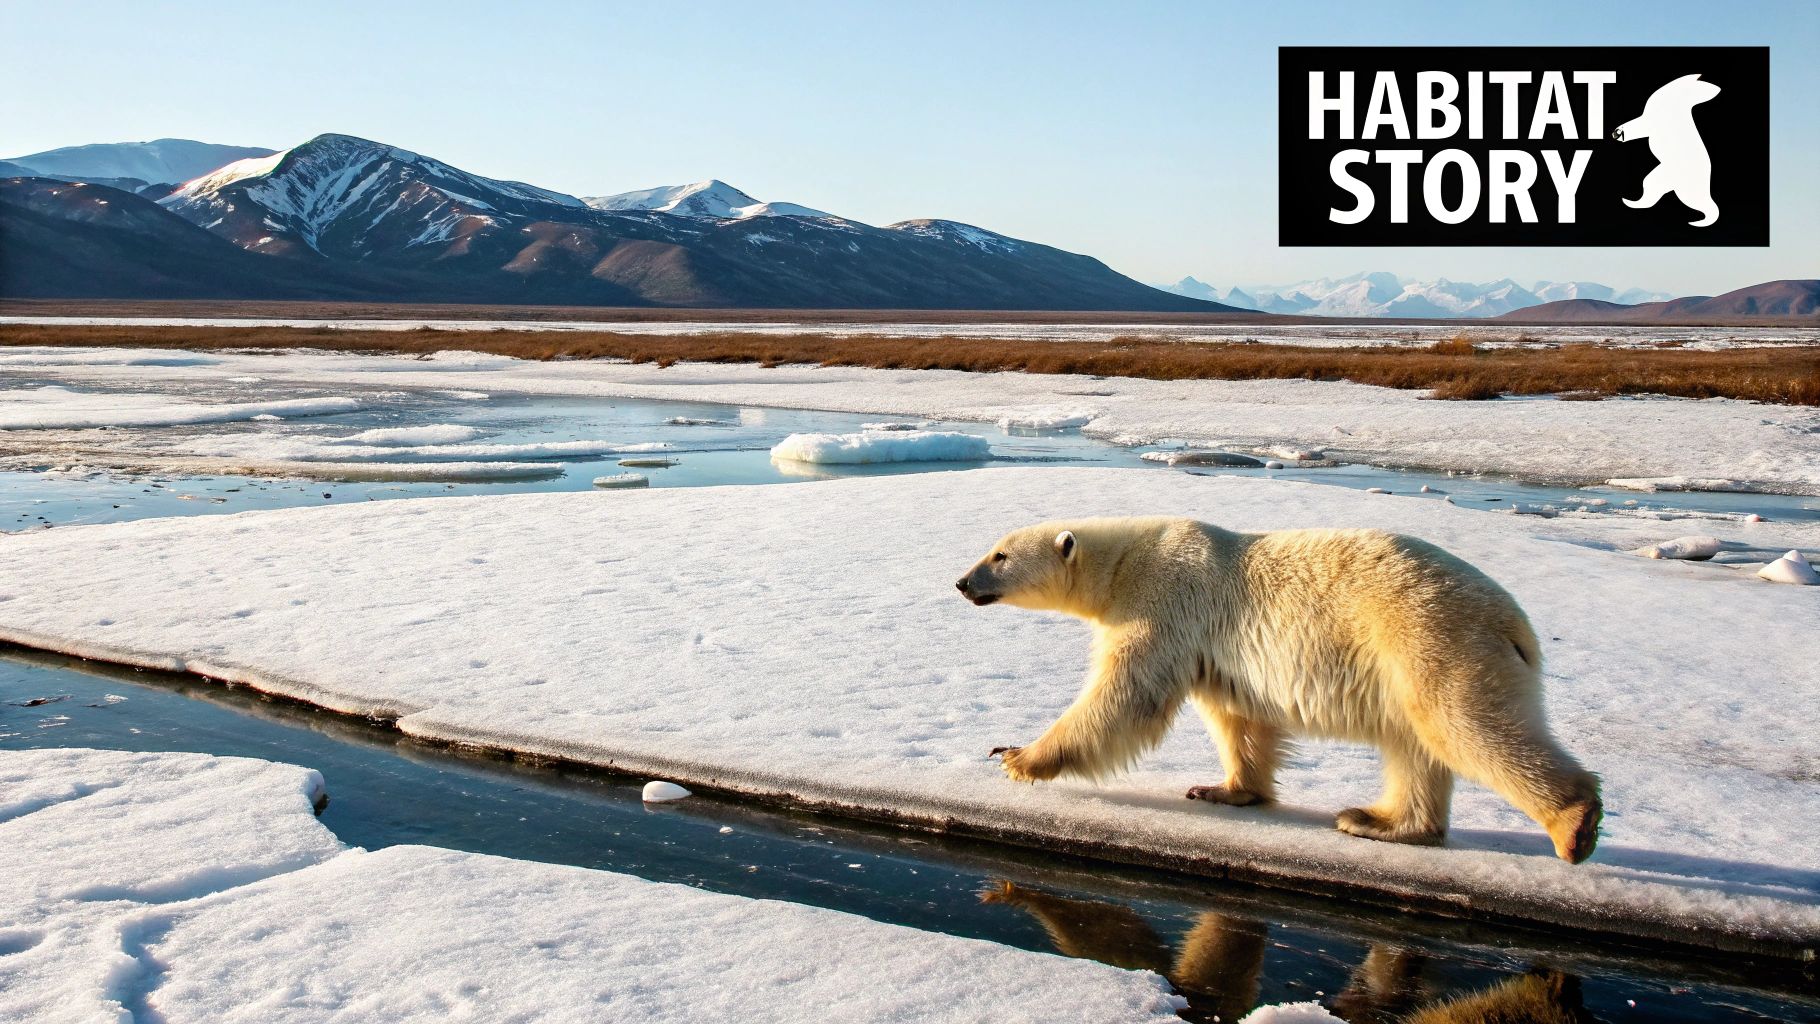
8. Environmental Storytelling and Habitat Context
While a tight portrait of an animal is powerful, one of the most impactful wild animal photography tips is to zoom out and tell a bigger story. Environmental storytelling involves capturing an animal within its natural habitat, using the surrounding landscape to provide context, narrative, and emotional depth. This approach transforms a simple animal photo into a compelling statement about its life, challenges, and ecosystem.
This technique, often used by conservation photographers, shows the relationship between the subject and its world. A lone polar bear on a shrinking ice floe tells a story of climate change, while an elephant framed against a backdrop of deforestation highlights human-wildlife conflict. These images resonate deeply because they connect viewers to broader conservation issues.
Why Tell a Story? The Key Benefits
Including the environment does more than just set the scene; it creates a more profound and memorable image. A key benefit is narrative impact. By showing the habitat, you give the viewer clues about the animal’s behavior, diet, and survival struggles. This adds layers of meaning that a simple portrait cannot convey, making your photography more meaningful.
Pro Tip: Look to the work of photographers like Paul Nicklen or Beverly Joubert. They are masters of using the environment to frame their subjects, creating images that are not just beautiful but also serve as powerful calls to action for conservation. Their work often inspires other art forms, a concept you can explore further in the captivating world of wildlife art.
Actionable Tips for Environmental Storytelling
Incorporating narrative into your shots requires a different mindset. Here are a few essential tips to get you started:
- Go Wide: While telephoto lenses are essential, don't forget your wide-angle or mid-range zoom lenses. A 24-70mm or 70-200mm can be perfect for showing an animal as a small part of a grand, sweeping landscape.
- Look for Context Clues: Pay attention to elements in the environment that tell a story. This could be anything from weather patterns and seasonal changes to signs of human impact like fences or roads.
- Compose with Layers: Create depth by composing with foreground, mid-ground, and background elements. Placing the animal in the mid-ground, for example, allows you to use the surrounding environment to frame it and add context.
Wild Animal Photography Tips Comparison
| Technique | Implementation Complexity 🔄 | Resource Requirements ⚡ | Expected Outcomes 📊 | Ideal Use Cases 💡 | Key Advantages ⭐ |
|---|---|---|---|---|---|
| Use Long Focal Length Lenses | Medium to High 🔄🔄 | High ⚡⚡ (Expensive lenses, tripods) | Detailed, frame-filling shots with background compression 📊📊 | Wildlife at a distance; sensitive or restricted areas | Safe distance, background isolation, bokeh |
| Master Animal Behavior and Patterns | High 🔄🔄🔄 | Moderate ⚡ (Time, research materials) | Predictable behavior for better timing and composition 📊📊 | Anticipating action; ethical, natural wildlife shots | Higher success rate, ethical shooting |
| Perfect Fieldcraft & Camouflage | Medium to High 🔄🔄 | Moderate ⚡ (Camouflage gear, patience) | Closer, undisturbed wildlife approach; authentic behavior 📊 | Skittish or elusive species; natural behavior capture | Closer shots, reduced animal stress |
| Optimize Camera Settings | Medium 🔄 | Low to Moderate ⚡ (Camera gear) | Sharp action shots with high frame rate and accurate focus 📊 | Fast-moving wildlife; varying light conditions | Crisp images, creative motion control |
| Master Lighting & Golden Hour | Medium 🔄 | Low ⚡ (Timing, planning) | Warm, mood-rich images with enhanced colors and textures 📊 | Early mornings/evenings; portraits and landscapes | Visually appealing, active animal behavior |
| Employ Ethical Wildlife Practices | Medium 🔄 | Low to Moderate ⚡ (Patience, knowledge) | Sustainable, respectful wildlife interaction and imagery 📊 | All wildlife photography; conservation-focused shoots | Protects wildlife, builds trust |
| Focus Techniques & Eye Sharpness | Medium 🔄 | Moderate ⚡ (Advanced camera features) | Emotionally compelling images with sharp eyes 📊 | Portraits and close-ups of active or moving subjects | Strong emotional connection, precise focus |
| Environmental Storytelling & Habitat | High 🔄🔄🔄 | Moderate to High ⚡ (Varied lenses, planning) | Impactful images with ecosystem context and conservation message 📊 | Conservation storytelling; broad audience engagement | Meaningful context, conservation education |
Bringing It All Together: Your Next Steps in the Wild
You've just navigated a comprehensive field guide of actionable wild animal photography tips, moving far beyond generic advice into the realm of truly impactful image-making. We've covered the technical, the creative, and the ethical, providing a holistic framework for your journey. From selecting the right long focal length lens to mastering the subtle art of fieldcraft and camouflage, each piece of advice is a vital component of a successful outing.
Remember, a great wildlife photograph is rarely a happy accident. It's the culmination of preparation, patience, and a deep understanding of your subject. By learning to predict animal behavior, optimizing your camera settings for split-second action, and harnessing the magic of the golden hour, you place yourself in the best possible position to capture those once-in-a-lifetime moments. The real artistry, however, comes from weaving these elements together.
The Core Pillars: Patience, Ethics, and Story
If you take away only a few key ideas, let them be these. Patience is your most valuable asset; the wild operates on its own schedule, and the best photographers are those willing to wait for the perfect moment to unfold. Ethical practices are non-negotiable. Always prioritize the well-being of your subjects, ensuring your presence never causes stress or harm. Your images should be a celebration of nature, not a record of its disturbance.
Finally, remember the power of environmental storytelling. An animal portrait is beautiful, but an image that includes the habitat tells a complete story. It provides context, evokes emotion, and connects the viewer to the creature’s world on a much deeper level. This narrative approach transforms a simple snapshot into a compelling piece of art. Your goal isn't just to show what an animal looks like but to convey what it feels like to witness it in its natural element.
Your Path Forward
The journey to becoming a skilled wildlife photographer is one of continuous learning and practice. Don't be overwhelmed by the sheer number of techniques; instead, focus on incorporating one or two new skills into your next excursion.
- Practice with a purpose: Before your next trip, decide to focus specifically on mastering back-button focus or experimenting with slower shutter speeds for motion blur.
- Study your subjects: Spend time learning about a local species. Where do they feed? When are they most active? This knowledge is just as crucial as your camera settings.
- Review and refine: After each shoot, critically analyze your photos. What worked? What didn't? Was the focus sharp? Could the composition be stronger? This feedback loop is essential for growth.
By consistently applying these wild animal photography tips, you'll not only see a dramatic improvement in your images but also develop a more profound connection to the natural world. Your photography can become a powerful voice for conservation, a window into the wild that inspires awe and respect in others. So, get out there, be patient, be ethical, and start telling the incredible stories that are waiting to be told.
For a masterclass in how powerful composition and a deep understanding of animal essence can create breathtaking art, explore the gallery at William Tucker Art. His work perfectly illustrates how capturing an animal's spirit, not just its image, can lead to truly timeless and inspiring pieces. Discover your inspiration at William Tucker Art.